پیکربندی Dell EMC Unity VSA در VMware vSphere

ارسال شده توسط admin | در دسته بندی وبلاگ

پیکربندی Dell EMC Unity VSA در VMware vSphere

این پست جدید از سایت وی سنتر قصد داریم به مراحل پیکربندی Dell EMC Unity VSA در VMware vSphere و نحوه استقرار آسان و سریع آن بپردازیم. به طور مشخص این پیکربندی از یک پلتفرم VMware vSphere استفاده می کند که روی لابراتوار شرکت اینتل تست شده است. هدف از آماده سازی این پست کسب اطلاعات لازم در خصوص این راهکار و همچنین راهکار نظیر Veeam Backup & Replication می باشد.

هدف اصلی برای استفاده از این راهکار ، استفاده از قابلیتهای ذخیره سازی مبتنی بر نرم افزار موسوم به software defined storage می باشد که می توان با استفاده از این قابلیتها ، سناریوهای مختلفی مانند VMware Datastores ، LUNs ، File Server و NDMP ایجاد نمود.

گروه فنی و مهندسی وی سنتر ارائه دهنده راهکارهای ذخیره سازی و بکاپ قصد دارد تا مجموعه مقالات مرتبط با این مقاله را آماده سازی و در اختیار شما عزیزان قرار دهد که از آن می توان به موارد زیر اشاره کرد:

  • پیکربندی Dell EMC Unity VSA در VMware vSphere
  • پیکربندی Dell EMC Unity VSA
  • ساخت یک Dell EMC Unity NAS Server
  • ساخت یک فایل سیستم و Share در Dell EMC Unity VSA
  • فعال سازی Dell EMC Unity برای NDMP backup


مزایای استفاده از Dell EMC Unity VSA

نرم افزار Dell EMC Unity VSA یک نرم افزار استوریج از نوع SDS می باشد که توسط یکی سیستم واحد با نام Unity ، به کاربران امکانات و انعطاف پذیری بیشتری ارائه می دهد. نرم افزار Dell EMC Unity در نوع کلی Professional و Community Edition طراحی و تولید شده است. این دو نسخه حرفه و عمومی نام دارند. در این پست به بررسی نسخه عمومی Community Edition CE خواهیم پرداخت که دسترسی فضای ذخیره سازی حداکثر ۴ ترابایت را در اختیار کاربر قرار می دهد.

استوریج Unity با فرمت Virtual Storage Appliance VSA ارائه و ارسال می گردد و برای کاربری های خانگی و دفاتر کوچک بسیار مناسب می باشد. نرم افزار Dell EMC Unity با استفاده از یک رابط وب ساده می تواند دسترسی به انواع حافظه و پروتکل های رایج را در اختیار کاربر قرار دهد و همچنین می تواند براحتی با VMware vSphere ادغام شود. این نرم افزار استوریج می تواند فضای ذخیره سازی لازم برای VMware Datastores ها و امکان Snapshot گیری از Volume ها را فراهم کند. این یک ویژگی عالی برای استفاده در هنگام محافظت از ماشین های مجازی با استفاده از پشتیبان گیری از Snapshot های استوریج می باشد  که در ادامه به تفصیل شرح داده خواهد شد. Snapshot های فوری استوریج نیز به طور فزاینده ای به یک خط دفاعی مستحکمی در برابر تهدیداتی مانند باج افزار تبدیل می شوند و همچنین برای محیط های بزرگ دارای RPO و RTO بالا مفید می باشند.

نحوه پیکربندی Dell EMC Unity VSA در VMware vSphere

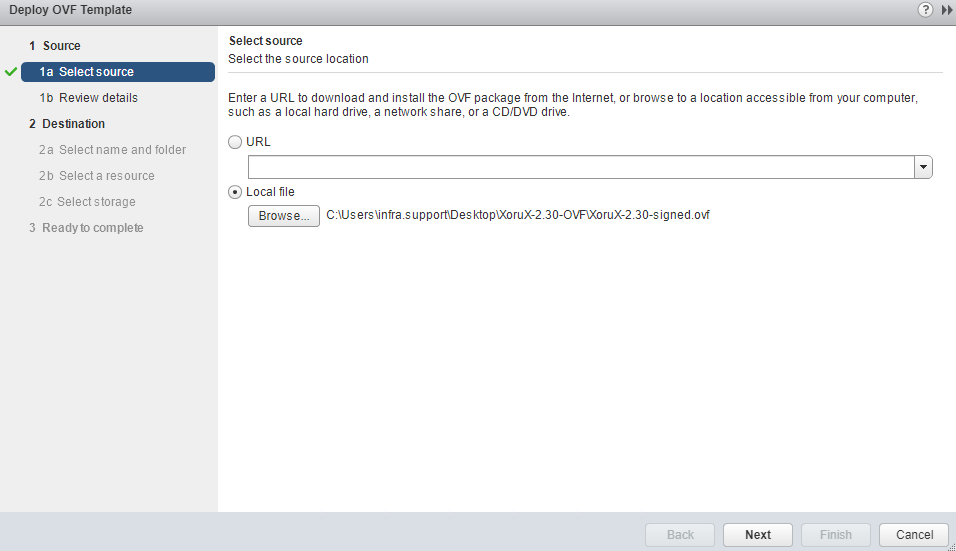
اولین قدم ایجاد یک VM برای میزبانی Dell EMC Unity VSA می باشد. مشخصات فنی سنگینی برای اجرای این نرم افزار استوریج نیاز نیست و در صورت نیاز می توان در آینده ماشین مجازی را ارتقا داد. با توجه به اینکه انتظار نمی رود منابع زیادی برای چنین محیط هایی مصرف شود نرم افزار Unity VSA همراه با فایل استاندارد ova ارائه می شود که در VMware vCenter براحتی Import می شود و بخش اول استقرار این نرم افزار از اینجا آغاز می شود.

پیکربندی Dell EMC Unity VSA در VMware vSphere

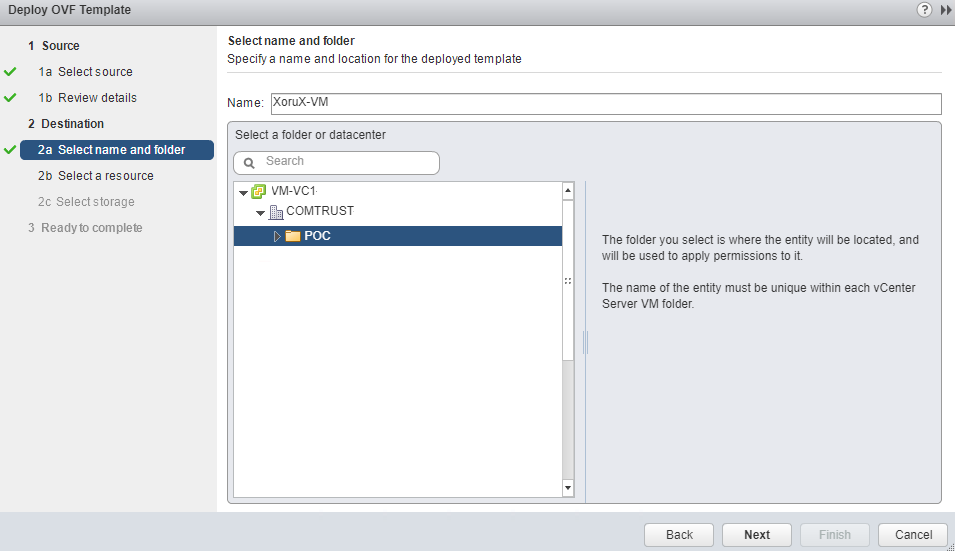
در مرحله بعد باید نام مورد نظر برای VSA و موقعیت مکانی در زیرساخت های فعلی را انتخاب می کنیم.

پیکربندی Dell EMC Unity VSA در VMware vSphere

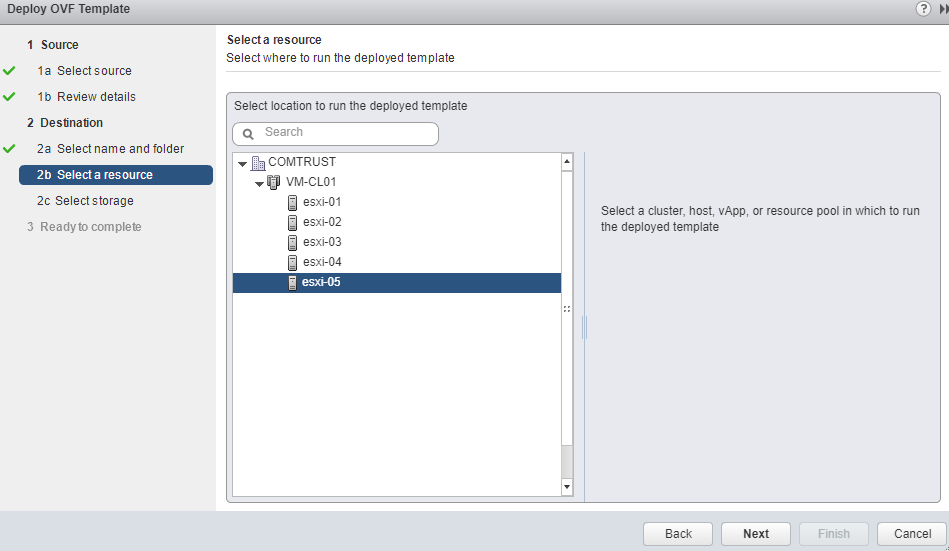
از پنجره بعدی باید اکنون مشخص کنیم که کدامیک از هاستهای VMware vSphere باید با نرم افزار VSA Appliance در ارتباط باشند.

پیکربندی Dell EMC Unity VSA در VMware vSphere

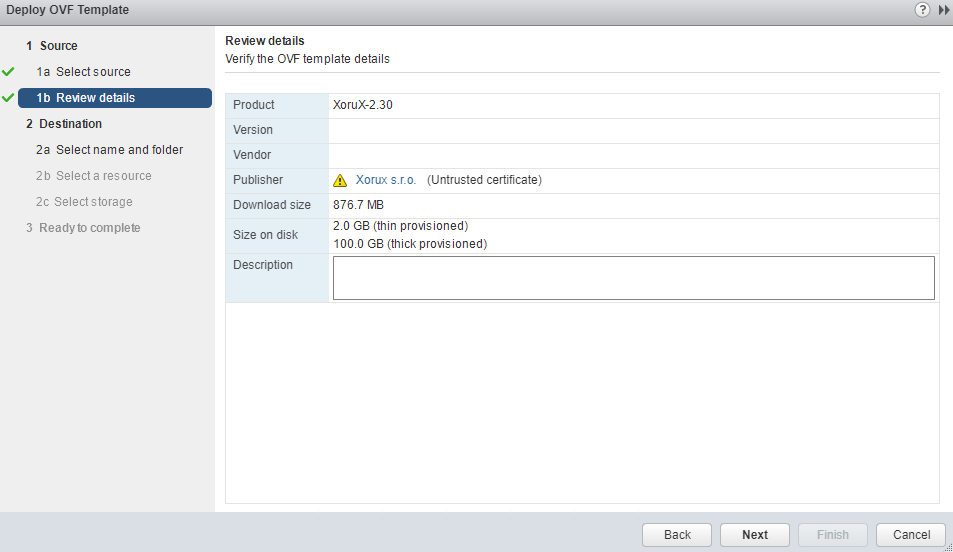
صفحه ویزارد اکنون داده های موجود بسته ova را می خواند و این فرصتی برای مرور جزئیات اصلی مانند گواهینامه ، اندازه و اندازه بارگیری شده روی دیسک و همچنین نوع ذخیره سازی Thick یا Thin را نمایش می دهد. نسخه جدیدی از نرم افزار Dell EMC Unity VSA منتشر شده است که نسخه 4.4.0 می باشد. البته باید اشاره کرد که کلیه مراحل نصب و پیکربندی تقریباً مانند همین مراحل می باشد.

پیکربندی Dell EMC Unity VSA در VMware vSphere

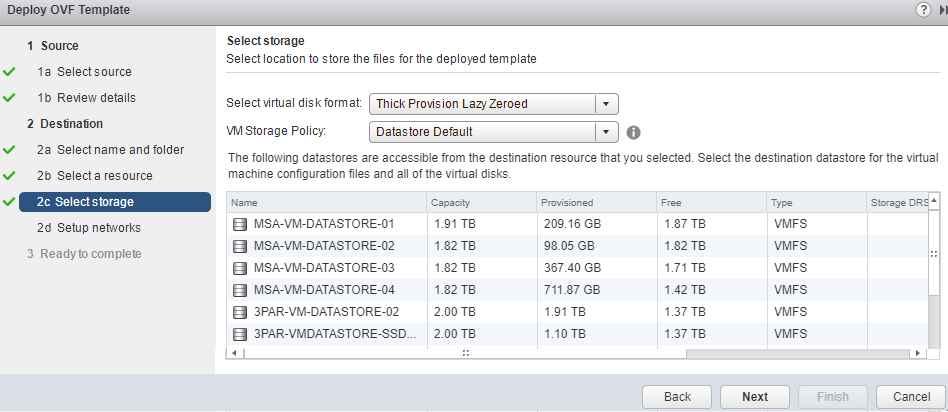
در بخش Storage ، باید هاست و VMware Datastore مورد نظر برای نصب و استقرار Unity VSA را انتخاب نمود.

پیکربندی Dell EMC Unity VSA در VMware vSphere

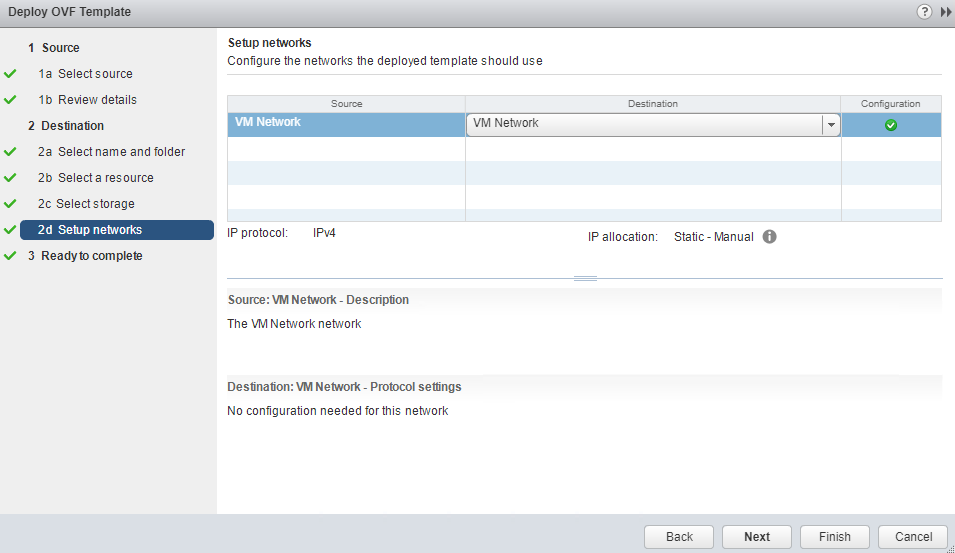
در بخش Network ، صفحه ویزارد از پیکربندی VSA می تواند امکان ایجاد 5 شبکه مختلف را در اختیار سیستم قرار دهد. یکی از این شبکه ها برای مدیریت Unity VSA استفاده می شود. بقیه برای اتصال شبکه به دستگاه استوریج و بلعکس استوریج Unity VSA به تجهیزات دیگر استفاده خواهند شد.

پیکربندی Dell EMC Unity VSA در VMware vSphere

به عنوان آخرین مرحله قبل از ورود به خلاصه اصلی ، گزینه شخصی سازی تنظیمات استوریج Unity VSA مانند مدیریت آدرس IP و نام سیستم وجود دارد. پیشنهاد می شود که از یک آدرس IP ثابت استفاده شود و همچنین رکوردهای مربوط به نام سرور اعم از رکوردهای A و PTR ایجاد شوند تا استوریج بتواند براحتی با نام FQDN شناسایی شود.

پیکربندی Dell EMC Unity VSA در VMware vSphere

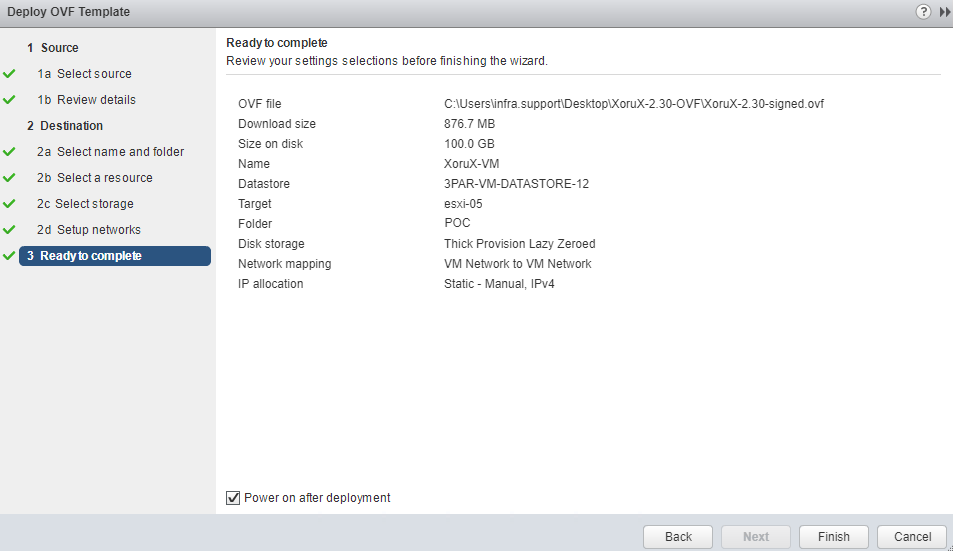
در این مرحله ، صفحه ویزارد تمام اطلاعات را برای شخصی سازی الگوی ova و استقرار دستگاه استوریج Dell EMC Unity VSA جمع آوری کرده است.

پیکربندی Dell EMC Unity VSA در VMware vSphere

به عنوان یک مرحله اضافی قبل از شروع به کار با نرم افزار Unity VSA ، ایده اضافه کردن چند هارددیسک مجازی جدید است که به عنوان استوریج Unity VSA عمل می کنند. از این درایوهای سخت مجازی برای پیکربندی Storage Pools استفاده می شود که در پست های بعدی به آن اشاره خواهیم کرد.

پیکربندی Dell EMC Unity VSA در VMware vSphere

به عنوان نکته آخر ، توصیه می شود که حافظه RAM اختصاص داده شده از 12 گیگابایت کاهش ندهید چون باعث پایین آمدن کارایی دستگاه می شود و همچنین باعث می شود که مراحل نصب و پیکربندی کند شود. پس از اتمام کار در صورت عدم نیاز به این حافظه رم اضافی ، می توانید براحتی مقدار آن را در سیستم مدیریت مجازی ساز تغییر دهید.

ما در مقالات بعدی بصورت کامل به آموزش پیکربندی Dell EMC Unity VSA خواهیم پرداخت.

گروه فنی و مهندسی وی سنتر ارائه دهنده راهکارهای ذخیره سازی و بکاپ آمادگی خود را برای تامین کلیه نیازهای مشتریان در این حوزه اعلام می دارد.

0 دیدگاه | سپتامبر 28, 2019

تعریف دسترسی VMware در استوریج Dell EMC Unity

ارسال شده توسط admin | در دسته بندی وبلاگ

تعریف دسترسی VMware در استوریج Dell EMC Unity

تعریف دسترسی VMware در استوریج Dell EMC Unity

تعریف دسترسی VMware در استوریج Dell EMC Unity

تقریباً همه ذخیره سازهای Dell EMC Unity VSA یا حداقل اکثریت قریب به اتفاق آنها شامل انواع مختلف ذخیره سازی اعم از فایل و Block می باشند. به عنوان مثال در محیط های VMware امکان ذخیره سازی فایلهای VMFS ، NFS و VVol وجود دارد. همچنین گزینه ای برای ارائه CIFS Share برای Volume های SMB و NDMP وجود دارد. این بخش تمرکز بر روی ذخیره سازی VMware برای ایجاد Datastore می باشد. برای یک استوریج بلاک هر دو پروتکل ارتباطی iSCSI و FC پشتیبانی می شوند.

با پیکربندی دسترسی Dell EMC Unity برای محیط های VMware ، انعطاف پذیری و سهولت کاربری را بهبود می بخشد. به طور کلی مدیران VMware نیاز به مدیریت فضای ذخیره سازی و ایجاد LUN ها دارند. سپس دیتاستورها را تنظیم کنید. تمام این عملیات اکنون هنگام پیکربندی دسترسی Dell EMC Unity برای VMware از جمله گزینه های ثبت خودکار و اسکن فضای ذخیره سازی ، به طور خودکار اجرا می شوند. به این ترتیب میزبانهای در نظر گرفته شده VMware vSphere با Datastore های در نظر گرفته شده و سناریوهای در دسترس بودن بالا برای محیط های مجازی تسهیل می کنند.

دلیل مهم دیگر ، ادغام با VMware VAAI و VASA Provider می باشد.

VAAI vStorage API for Array Integration

VAAI با واگذاری مستقیم وظایف ذخیره سازی به دستگاه ذخیره سازی ، استفاده از میزبان VMware vSphere را بهبود می بخشد. همانطور که می دانید در اینجا Storage Processor یا پردازشکر استوریج بر روی استوریج Dell EMC Unity VSA در حال اجرا می باشد. بنابراین تمام عملیات مانند صفر کردن ، کپی کردن ، Cloning و غیره مستقیماً توسط Storage Procesor یا پردازنده استوریج انجام می شوندو از منابع هاستهای vSphere برای این کار استفاده نمی شود و این روش بسیار سریعتر می باشد.

VASA vStorage API for Storage Awareness

VASA یک API در ساختار VMware می باشد که به vSphere کمک می کند تا بتواند امکانات و توانایی های سیستم ذخیره سازی بهتر شناسایی کند. اطلاعاتی مانند مانیتورینگ و گزارش دهی جزئیات استوریج می توانند برای تعریف سیاست های ذخیره سازی برای Datastore ها استفاده شوند. این اطلاعات شامل اطلاعاتی مانند پشتیبانی از FAST Cache ، قابلیت thin provisioning و قابلیت auto-tiering بین داده های گرم و سرد می باشند.

برای کسب اطلاعات بیشر در خصوص APIs integrations می توانید با ما در این سایت همراه باشید.

نحوه تعریف دسترسی VMware در استوریج Dell EMC Unity

از داشبورد اصلی در بخش Access و در قسمت VMware گزینه ای برای شروع صفحه ویزارد برای شناسایی VMware vCenter و هاستهای موجود در زیرساخت های مجازی وجود دارد. برای افزودن یک محیط VMware 6.7 ، پیشنهاد می شود که Dell EMC Unity VSA 4.4 و یا نسخه های بالاتر استفاده شوند. اطلاعات بیشتر در خصوص نحوه به روزرسانی UnityOS در مقالات قبلی موجود است. برای اضافه کردن هاستهای VMware حتما اعتبار ادمین VMware لازم است.

تعریف دسترسی VMware در استوریج Dell EMC Unity

مرحله بعدی وارد کردن نام کاربری و کلمه عبور ادمین یا معادل آن برای Dell EMC Unity VSA می باشد و باید بر روی Register VASA Provider تیک بزنید. این عملیات در تمام قسمتهای هاستهای انتخاب شده vSphere اجرا خواهد شد.

تعریف دسترسی VMware در استوریج Dell EMC Unity

صفحه ویزارد اکنون تمام اطلاعات پردازش و تنظیم دسترسی Dell EMC Unity را برای VMware در اختیار دارد.

تعریف دسترسی VMware در استوریج Dell EMC Unity

چند ثانیه بعد ارائه دهنده VASA اکنون در تمام هاستهای VMware در این محیط VMware ثبت شده است.

تعریف دسترسی VMware در استوریج Dell EMC Unity

در قسمت View هاست ESXi ، جدول موارد پیکربندی شده به همراه vCenter را که با آن مرتبط هستند گزارش می دهد. نسخه Community UnityVSA تنها با یک VMware vCenter همزمان قابل پیکربندی می باشد. به محض اینکه ماشین های مجازی بر روی Datastore هایی که توسط UnityVSA بوجود آمده اند ، ذخیره می شوند این موارد در جدول ماشین های مجازی نیز قابل مشاهده خواهند بود.

تعریف دسترسی VMware در استوریج Dell EMC Unity

0 دیدگاه | سپتامبر 28, 2019

Upgrade Brocade SAN Switch Firmware

ارسال شده توسط admin | در دسته بندی Uncategorized

Upgrade Brocade SAN Switch Firmware


In this post will share you the process to update a Brocade Fibre Channel switch firmware.ANd it is recommended to confirm with OEM before you proceed for an upgrade of the firmware.

Prerequisite

FTP server accessible from SAN Switch

Supported Firmware

Pre-upgrade Process

Take Complete Backup of Switch Configuration and License details

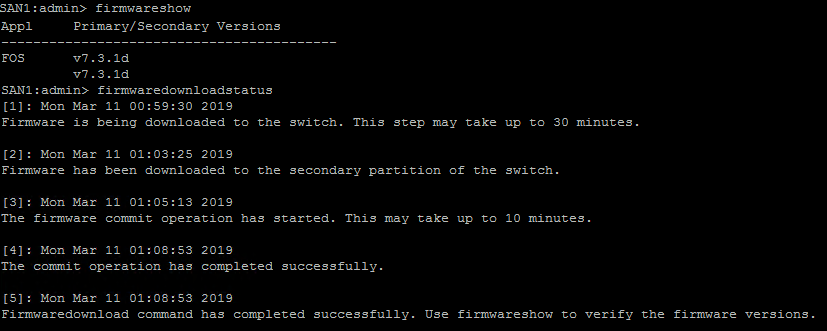
Check the current firmware version using below command

firmwareshow

Verify the upgrade path from within the Brocade Fabric OS Upgrade Guide which you will find in the Brocade document library. If your switch is provided by any other OEM like HPE, you have to check their site as well

  • Run a Brocade supportsave
  • You can also run error clear command all existing stats
errclear
  • Check no ports are G ports
switchshow
  • Check that no firmware upgrade is already in progress
firmwaredownloadstatus
  • If the switches are in a fabric run the commands below and capture the setting. Run these commands again after to ensure the fabric is healthy
nsshow

nsallshow

fabricshow
  • Download the switch firmware from Brocade   or from Specific OEM Site
  • Extract the Zip file and place it on your FTP server

Upgrade the Firmware 

  • Connect to the switch with an admin account
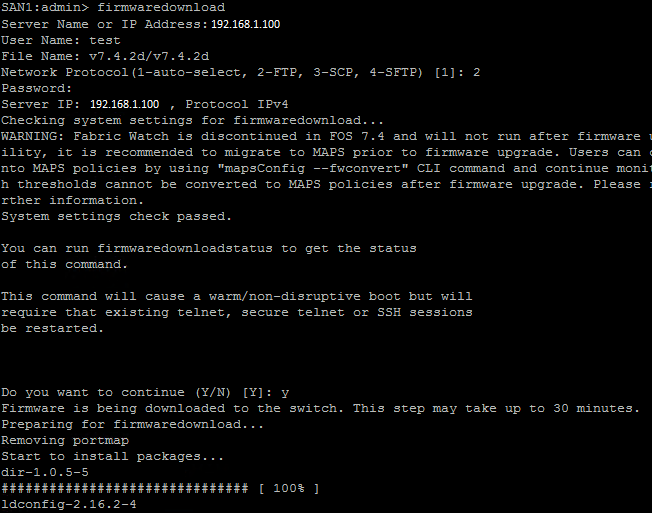
  • Enter the command to download the firmware and follow the prompts.
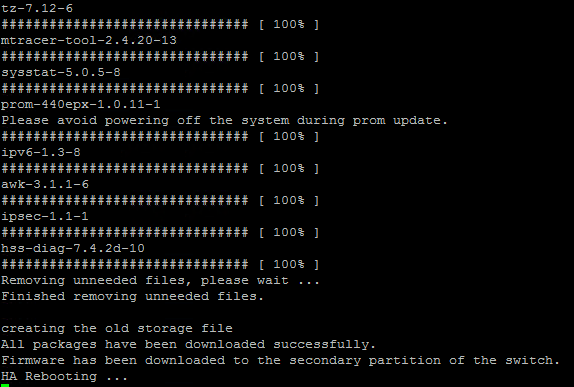
firmwaredownload

You will then see the switch update begin which will take aprox 30mins.

Post Upgrade Check

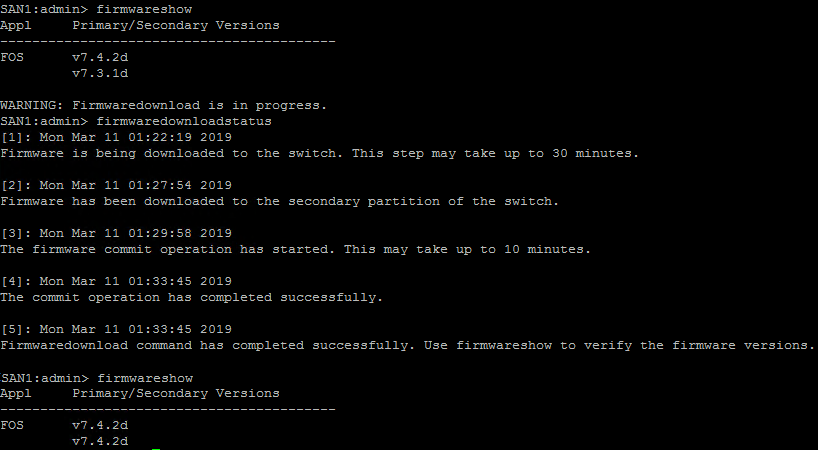
After rebooting the Switch will be available to access, login to switch and run upgrade status to verify that upgrade is completed or not.

firmwareshow

Note:- If you see message Firmware download is in progress wait for soem more time and check again

firmwaredownloadstatus


0 دیدگاه | سپتامبر 28, 2019

Free SAN And Storage Performance & Capacity Monitoring Tool – STOR2RRD

ارسال شده توسط admin | در دسته بندی Uncategorized

Free SAN And Storage Performance & Capacity Monitoring Tool – STOR2RRD


Every Infratire has backend as a different storage system and key challenges we face, especially in larger environments is managing systems from multiple vendors. Every organization has the same situation, and monitoring all of the different systems and keeping track of their performance and health are challenging because every vendor has its own set of tools.

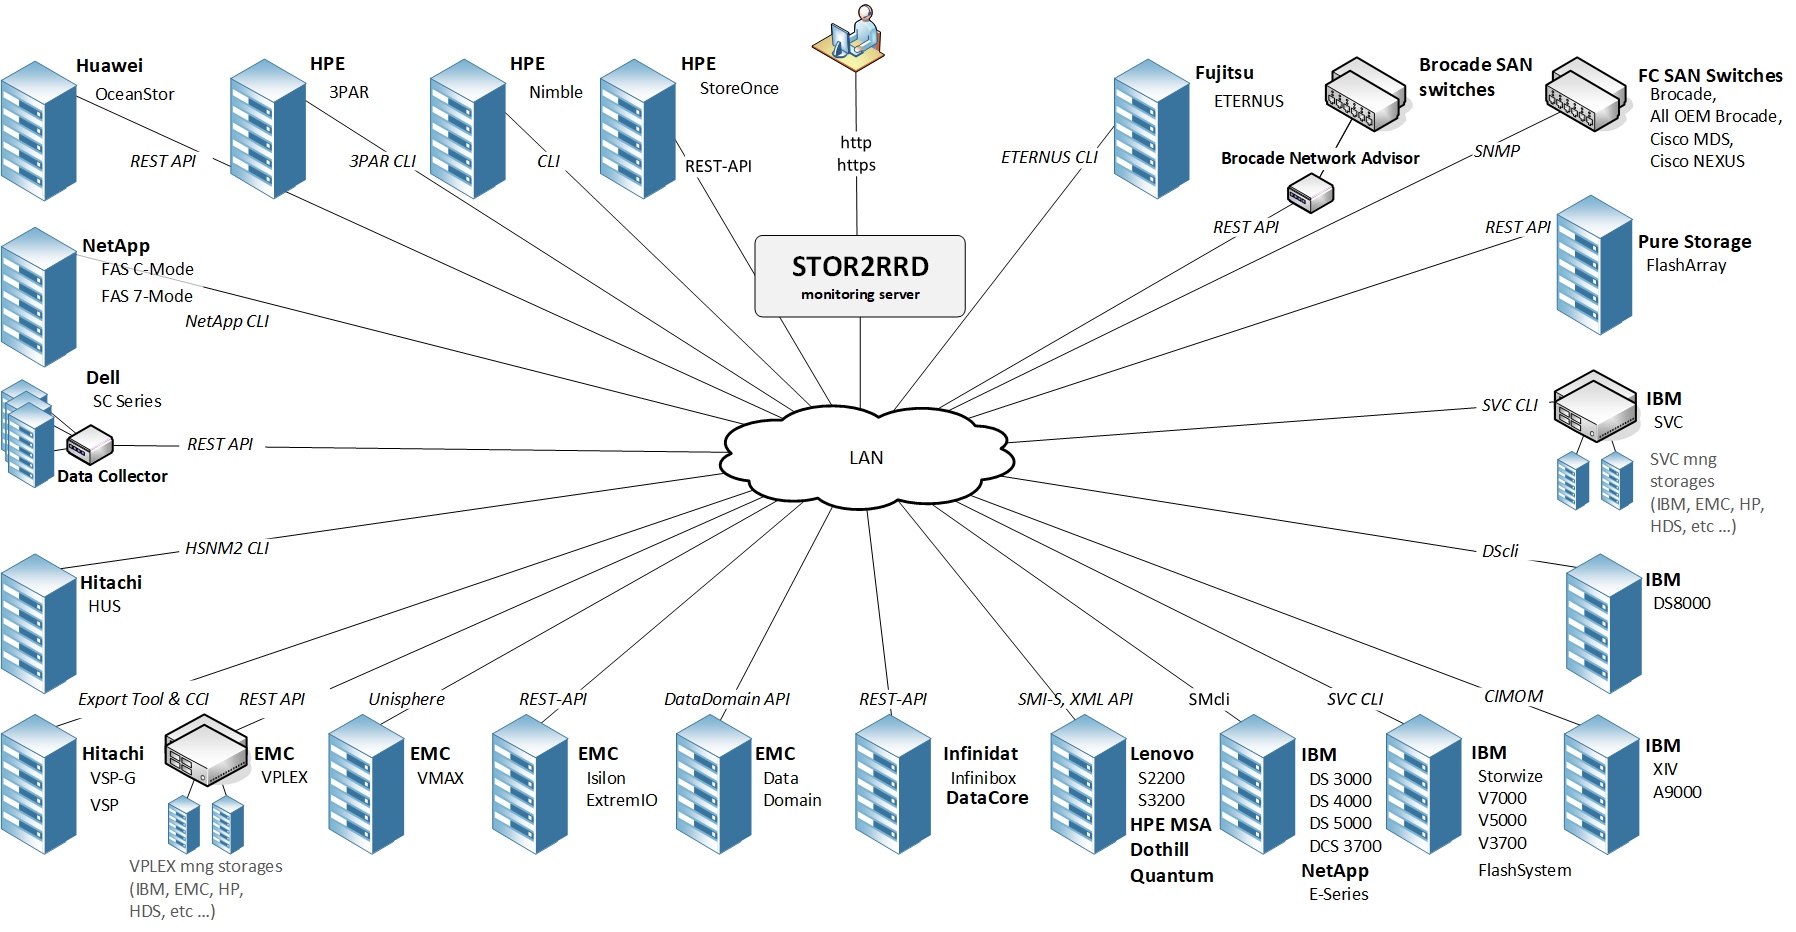
Now we have a solution to this challenge, Xorux has a single product, STOR2RRD will provide you a single web-based interface where you can view the performance of all your different systems.  STOR2RRD is one of the best tools offers you end-to-end views of your storage environment including LAN and SAN. It can save you significant money in operation monitoring and by predicting utilization bottlenecks in your virtualized environment. In this post, we will share the procedure to install and configure STOR2RRD Virtual Appliance with 3PAR  storage for real-time performance monitoring.


Also, you can generate policy-based alerts, view the overall health status of your systems, provide capacity reports and forecasting data.

  • Real-time storage, SAN and LAN performance visibility in multi-vendor environment
  • Historical reporting (graph, CSV, PDF, XLS)
  • Alerting based on performance thresholds
  • Event monitoring

The full list of supported systems is significant and includes both storage systems and switches which you can find here – supported systems

STOR2RRD  is free software which you can redistribute it and/or modify it under the terms of the GNU General Public License.
For customers, under support, there is distributed the enterprise edition with additional benefits.

Download STOR2RRD  Appliance

You can use VMware or Microsoft Hyper-V image for fast start or for product evaluation purposes.It contains installed and configured LPAR2RRD and STOR2RRD products with all their prerequisites.It is distributed in OVF or Hyper-V format easily importable in your infrastructure

Download

Virtual Appliance can be installed on below options

  • As a virtual machine in your vCenter or ESXi
  • On VMware player. A free non-commercial version.
  • As a virtual machine in your Microsoft Hyper-V server

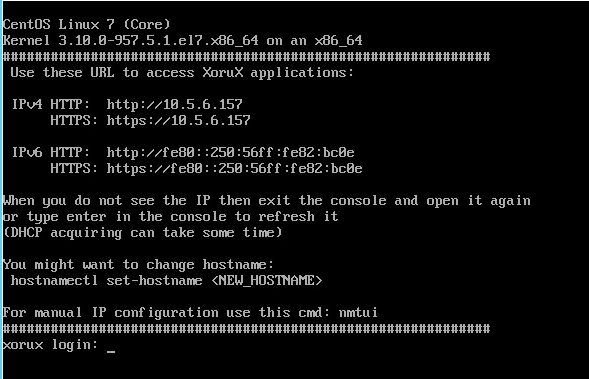
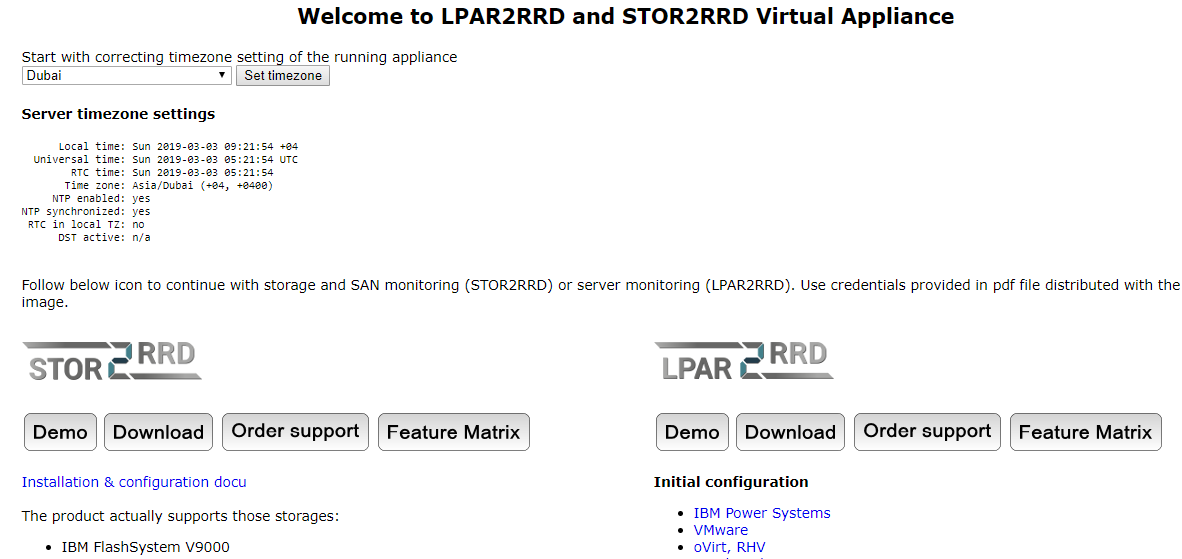
The acquired IP address will be visible on the console after the appliance starts up. Navigate to the web browser to the address shown on the welcoming screen.  http://<appliance IP>/

Product webs are accessible with these credentials:

WEB user admin (user “monitor” was used on Virtual Appliances v1.x)
Password <password can be found in the pdf document distributed together with the image>
Sites: http://<appliance IP>/stor2rrd

System Defaults

Operating System CentOS 7, 64bit
root <password can be found in the pdf document distributed together with the image>
lpar2rrd <password can be found in the pdf document distributed together with the image>
IP address DHCP

Virtual Machine settings

Processors 2
Memory 6GB
Hard-drive 100GB (thin provisioned)
Network Bridged (using DHCP)
VMware Tools installed (VMware image only)

The VMware image should work on recent VMware products as well on other virtualization software that support OVF (Open Virtualization Format). The image has been successfully installed on at least:

  • VMware player 6
  • VMware ESX 4.1 or Higher

Recommended HW sizing:

  • Evaluation purposes:
    • 6GB RAM
    • 2 CPU
    • 100GB disk space (thin provisioning)
  • Production with 1000 VMs and 10 storages
    • 12GB RAM
    • 4 CPUs
    • 100GB disk space (thin provisioning)

STOR2RRD OVF Deployment

Right-click the data center and select Deploy OVF Template.

Browse the file and Click Next

Review the details and Click Next

Provide a name for VM and Select the Folder and Click Next

Select the Esxi Host and Click Next

Select the Datastore and Click Next

Select the Network and Clik Next

Review the Details and Finish, select the power on after deployment option

Once VM is powered on you can view the IP of the machine in the console.

Verify that Application is working by Open: https://<appliance IP>/ from browser


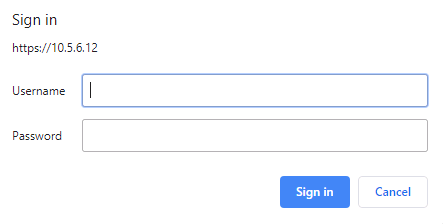
Login to the STOR2RRD console using  url  ” https://ip_or_fdqn/stor2rrd/ ”  and you have to enter the username and password (admin/admin)

NOw you are logged to the first-time console look like below

Virtual Appliance contains all required software except 3rd party storage APIs which cannot be freely distributed, they must be installed manually, refer to your storage installation.

Note: STOR2RRD is installed under user lpar2rrd in Virtual Appliance.

Configure the Storage

Now we have set passwordless ssh access to storage from our STOR2RRD appliance

  • Do all actions below under stor2rrd account (lpar2rrd on the Virtual Appliance) unless is explicitly specified root in the procedure, here use lpar2rrd since we use the virtual appliance
  • Create user stor2rrd on the storage with browse role and allow it for all domains.

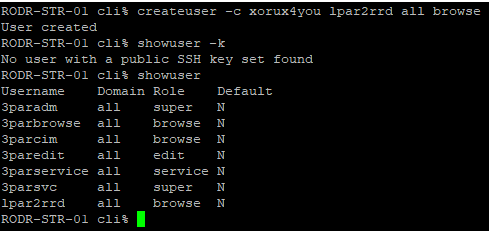
Login to 3PAR Storage using putty and create using below command

# createuser -c "password" "username" all browse


Under lpar2rrd account create config entry

# su - lpar2rrd (user stor2rrd if it is not an Appliance)
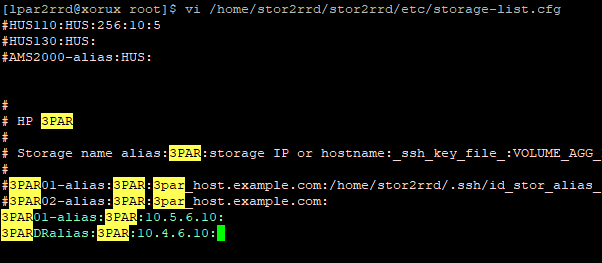
#vi /home/stor2rrd/stor2rrd/etc/storage-list.cfg

Open port 22 to the storage and test its working or not

$ perl /home/stor2rrd/stor2rrd/bin/conntest.pl "3PARIP" 22
  Connection to "3PARIP" on port "22" is ok

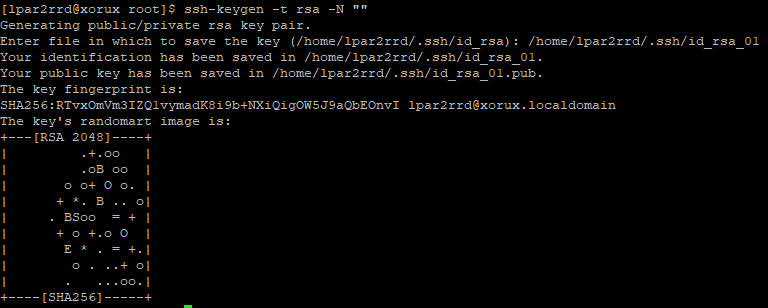
Create a key pair using the ssh-keygen utility in case you do not have a one in /home/stor2rrd/.ssh

Type enter instead of a passphrase, if you have more than one storage provide another file name

$ ssh-keygen -t rsa -N ""
  Generating public/private rsa key pair.
  Enter file in which to save the key (/home/stor2rrd/.ssh/id_rsa):

$ cat ~/.ssh/id_rsa.pub

Exchange the ssh public key (import it on the storage under stor2rrd /lpar2rrd account)

# ssh lapr2rrd@3par_storage stor2rrd@3par_storage password: "password"

#setsshkey

Enter the SSH public key below. When finished, press enter twice. The key is usually long.
It’s better to copy it from inside an editor and paste it here. (make sure there is no extra blanks)

 sshrsa AF5afPdciUTJ0PYzB6msRxFrCuDSqDwPshqWS5tGCFSoSZdE= stor2rrd pubic key
 SSH public key successfully set!

Check the storage connection, you should log in without password prompt

$ ssh stor2rrd@3par_storage

Check storage connectivity

$ cd /home/stor2rrd/stor2rrd
$ ./bin/config_check.sh 
  =====================
  STORAGE: 3par01: 3PAR
  =====================
  ssh -o ConnectTimeout=15 -i /home/stor2rrd/.ssh/id_rsa  lpar2rrd@3PARIP  "showuser"
  connection ok

Schedule to run storage agent from stor2rrd crontab (lpar2rrd on Virtual Appliance, it might already exist there)

$ crontab -l | grep load_3parperf.sh
$

Add if it does not exist as above

$ crontab -e

# HPE 3PAR storage agent
0,5,10,15,20,25,30,35,40,45,50,55 * * * * /home/stor2rrd/stor2rrd/load_3parperf.sh > /home/stor2rrd/stor2rrd/load_3parperf.out 2>&1

Assure there is already an entry with the UI creation running once an hour in crontab

$ crontab -e

# STOR2RRD UI (just ONE entry of load.sh must be there)
5 * * * * /home/stor2rrd/stor2rrd/load.sh > /home/stor2rrd/stor2rrd/load.out 2>&1

Let run the storage agent for 15 – 20 minutes to get data, then:

$ cd /home/stor2rrd/stor2rrd
$ ./load.sh

Wait for few minutes and refresh the web console and you can start the performance monitoring


Reference

Conclusion

We have successfully deployed STOR2RRD appliance in our environment to monitor the 3PAR storage system, it really awesome product it was the solution to our monitoring challenge, every time any issue comes we have to open a case with HPE for performance report and fight with application team to make them understand storage is working fine. After deploying STOR2RRD it really provides a capacity overview, utilization of CPG, IO utilization, etc and it really helps us to resolve many issues.

0 دیدگاه | سپتامبر 28, 2019

HP 3PAR SSMC – StoreServ Management Console

ارسال شده توسط admin | در دسته بندی Uncategorized

HP 3PAR SSMC – StoreServ Management Console


Old  3PAR Inform Management Console wasn’t exactly the best, screen refreshes taking a while, being logged out of StoreServ’s with the connection still showing as open.

HP’s new 3PAR StoreServ Management Console – ‘SSMC’ is more features and stable one.

What’s New

  • New dashboard with the same look and feel as OneView
  • Management of file and block from same interface
  • Inbuilt System Reporter
  • Web based
  • Smart Search across all objects

Compatibility

SSMC will be compatible with 3PAR Inform OS 3.1.3 or above.

License

No licenses are required this will be a free download

Supported Operating Systems

SSMC will be available as a Windows based install on Windows Server 2008 R2, 2012 or 2012 R2.  It will also be available in certain flavours of Linux

0 دیدگاه | سپتامبر 28, 2019

HPE 3 PAR With VMware Virtual Volumes (VVols)

ارسال شده توسط admin | در دسته بندی Uncategorized

HPE 3 PAR With VMware Virtual Volumes (VVols)


VVols is  was a new storage architecture introduced in vSphere 6 and further enhanced with vSphere 6.5. HPE is a key design partner with VMware who selected HPE 3PAR StoreServ as the Fibre Channel (FC) reference platform for VMware’s engineering team. HPE 3PAR StoreServ provides a tightly integrated experience that does not require an additional plug-in or software piece to enable VVols and to support VMware’s VASA 3.0 specification. HPE 3PAR delivers unique capabilities, like ASIC-based Zero Detect for space reclamation and tiered snapshots, which can be assigned on a per-VM basis through VMware’s Storage Policy Based Management (SPBM).VVols eliminate the need to provision large datastores (LUNs) for VMFS volumes; storage provisioning now happens automatically on a per-VM basis. Each VM is assigned its own unique VVols, which is equivalent to a traditional storage LUN. With the tight integration with HPE 3PAR StoreServ Storage, customers will be able to deploy VVols, in parallel with VMware’s Virtual Machine File System (VMFS) where necessary. VVols introduces two big benefits: (1) VM-level granularity by introducing a one-to-one mapping of VMs to storage volumes, and (2) support for VMware’s Storage Policy Based Management (SPBM) to simplify storage management and automate storage provisioning and space reclamation. Before the introduction of VVols, storage arrays primarily integrated with vSphere at the datastore level using VMware’s VMFS.Moving forward, users can choose to use VMFS or VVols (or both), with VVols offering more advanced capabilities.

Comparison Between Tradition VMFS  Datastore and VVols

Architecture overview of VVols on HPE 3PAR

VMware Virtual Volumes with HPE 3PAR StoreServ Storage changes the storage architecture of vSphere from LUN-centric to VM-centric and allows storage arrays to become VM-aware. HPE 3PAR StoreServ integration with VVols shifts many common storage operations from the
vSphere host to the HPE 3PAR StoreServ array and enables the VMware vSphere VASA client to do the following:


• Dynamically create and manage HPE 3PAR StoreServ volumes
• Create, snapshot, clone, and delete HPE 3PAR StoreServ array volumes
• Discover HPE 3PAR StoreServ storage capabilities available for VVols
• Discover compliance issues with requested capabilities for VVols
• Automatically reclaim space when VMs are deleted or moved

The technology shift from a SCSI LUN-based model to an object-based model is the core difference introduced with vSphere 6 and VVols. VVols are object storage access, different from traditional block storage (LUN). Instead of the traditional approach of simply presenting a LUN (a linear range of Logical Block Addresses [LBAs]), vSphere 6 now manages data placement and access, giving the HPE 3PAR StoreServ Storage visibility into what LBAs correspond to objects such as a VMDK, configuration, swap, or clone.

VVols with the VASA Provider providing control path and the Storage Container on HPE 3PAR StoreServ Storage

HPE 3PAR StoreServ Storage supported features with VVols

The following HPE 3PAR features are supported with VVols

• Array-based snapshots
• Space reclamation (UNMAP)
• Array-based thin provisioning
• Thin deduplication
• Array-based replication
• Auto Zero Detect
• Adaptive flash cache

Each of the features listed above are resource intensive when performed by the host. By shifting them to the storage array using VVols, they are performed faster and more efficiently and help to increase available host resources.

More –  Implementing VMware Virtual Volumes on HPE 3PAR StoreServ

For VVols replication – HPE 3PAR StoreServ and VMware VVols Replication Implementation Guide

Note :-
VMware VVols 2.0 (VASA 3.0) was released as part of vSphere 6.5, which is supported for HPE 3PAR OS 3.3.1 and higher and includes support for array based replication. VVols eliminate the need to provision large datastores for ESXi hosts, and offer more flexibility in managing storage
associated with virtual machines.

0 دیدگاه | سپتامبر 28, 2019

HPE 3 PAR With VMware VAAI (VSphere Storage APIs For Array Integration)

ارسال شده توسط admin | در دسته بندی Uncategorized

HPE 3 PAR With VMware VAAI (VSphere Storage APIs For Array Integration)


VAAI (vSphere Storage APIs for Array Integration) The vSphere Storage APIs are a set of technologies and interfaces that enable vSphere to leverage storage resources to deliver the efficiency, control, and ease of customization that clients demand of their virtual environment. The vSphere Storage APIs for Array Integration (VAAI) is one of these technologies. Under the VAAI initiative, APIs have been introduced to improve performance, resource utilization, and scalability by leveraging more efficient array-based operations.

vSphere 5 and 6 provide enhanced support for the T10 SCSI standard without the need to install a plug-in, enabling vSphere to directly utilize more advanced features of the storage array. Native T10 support is built into HPE 3PAR OS 3.1.1 and greater, allowing the ESXi host to communicate directly to HPE 3PAR StoreServ Storage without a VAAI plug-in.

Some of the important hardware primitives that VAAI enables are documented below:

Hardware Assisted Locking eliminates SCSI reservation contention by providing a fast, fine-grained locking mechanism. The ATS (“Atomic Test and Set”) command verifies that a block of metadata is what is expected (test) and then replaces it with an updated block (set) in a single, atomic operation. Using this command, the ESXi host can lock a portion of a LUN related to a single VM instead of locking the whole LUN as seen inFigure 9, thereby allowing other VMs on the same LUN to continue operating normally. The implementation of ATS on HPE 3PAR StoreServ Storage arrays uses the HPE 3PAR StoreServ ASIC to further improve performance. The combination of ATS and the HPE 3PAR StoreServ ASIC allows an increase in VM density per LUN and greater scalability for vSphere deployments.

Fast Copy uses the XCOPY command to improve the performance of common storage operations, such as VM cloning and Storage vMotion,by performing large data movement operations directly within the storage array. By not requiring each block to make a round-trip to the host,the time required for these operations is significantly reduced and storage network traffic minimized. When combined with HPE 3PAR Thin Persistence Software, drive I/O and storage capacity can also be reduced since blocks of zeros are not written due to the array’s Zero Detect capability, which is integrated into the HPE 3PAR StoreServ ASIC.Block Zeroing uses the standard SCSI command WRITE_SAME to offload large, block-level write operations of zeros from the host to the storage array. Block zeroing improves host performance and efficiency when allocating or extending Eager Zeroed Thick (EZT) virtual disks, or on initial access to a block on a non-EZT virtual disk. When combined with built-in Zero Detect and EZT virtual disks, storage array bandwidth, disk I/O bandwidth, and disk consumption is minimized. Initializing EZT virtual disks in seconds rather than minutes eliminates the tradeoff between fast VM creation and more predictable run-time performance

HPE 3PAR storage system supports VAAI using the “esxcli storage core device list” command

VAAI UNMAP command

Note
With vSphere 6.5, UNMAP commands may be issued by the guest OS (with the restrictions listed below), and no CLI operations are necessary to reclaim space when these conditions are met.

UNMAP is a SCSI primitive that allows VMFS to communicate to the storage target that certain blocks are no longer used on a LUN backing a datastore. Using the UNMAP command, vSphere can issue a command to the storage array to deallocate blocks of storage freed by vSphere,for example from a deletion of a VM, and return it to the storage array’s resource pool without the involvement of a storage administrator.
For vSphere 6, it is now possible for a guest OS to issue an UNMAP command to reclaim space. There are several prerequisites that must be metto allow UNMAP to run:

• The VMDK for the VM must be thin provisioned.
• The VM hardware version must be 11 (ESXi 6.0).
• The ESXi host advanced setting EnableBlockDelete must be set to 1.
• The guest OS must be able to identify the disk as thin.

Note : Windows 2008 and above is able to detect that the disk is thin provisioned.
SPC-4 SCSI command support was added in vSphere 6.5, allowing UNMAP commands to work with compatible Linux guest filesystems.UNMAP priority can be configured via the GUI or CLI: esxcli storage VMFS reclaim configuration set

UNMAP priority configuration via the GUI

More –  VMware vSphere VAAI for HPE 3PAR Storageperformance benefits 

0 دیدگاه | سپتامبر 28, 2019

HPE StoreVirtual Storage: StoreVirtual OS 12.7

ارسال شده توسط admin | در دسته بندی Uncategorized

Product details and specifications
Select
Overview
All software components for HPE StoreVirtual are available from this page – whether you are just getting started as a new HPE StoreVirtual Storage customer, or need to download some additional components, you have come to the right place.

HPE Storage is pleased to announce the availability of StoreVirtual OS 12.7. All downloads on this page are for StoreVirtual OS 12.7(formerly called SAN/iQ and LeftHandOS). This version of StoreVirtual OS runs on the following platforms:

  • HPE StoreVirtual VSA Software
  • HPE StoreVirtual 4000 Storage

On this page you will find the following downloads:

  • Individual software components
  • Quick Restore DVDs for HPE StoreVirtual 4000 Storage
  • Documentation

StoreVirtual OS 12.7 is the newest version of the StoreVirtual Operating System. New features of StoreVirtual OS include support for VMware ESX 6.5 and Windows Server HyperV hypervisors as well as integration with HPE Recovery Manager Central.

I am new to HPE StoreVirtual.
How do I get started?
I am an existing HPE StoreVirtual customer.
Where do I find software components for StoreVirtual OS 12.7?
Congratulations on your new storage system! Your new system comes with a pre-installed version of the newest StoreVirtual OS and is ready to go. To get started with HPE StoreVirtual and creating your first cluster, you need the following components:

  1. HPE StoreVirtual Centralized Management Console
  2. HPE StoreVirtual VSA 2014
    (for StoreVirtual VSA customers)
  3. HPE StoreVirtual Quick Start Guide

You can click on “Select” in the upper right corner now to download these components.

To upgrade to StoreVirtual OS 12.7, use the Online Upgrade capability available via the Centralized Management Console.

You can also download the additional components on this page including:

  • HPE StoreVirtual Application Aware Snapshot Manager
  • HPE StoreVirtual Quick Start Guide
  • HPE StoreVirtual User Guide

You can click on “Select” in the upper right corner now to download these components.

New Customers: Getting started…

Thank you for choosing HPE Storage and congratulations on your new HPE StoreVirtual Storage system!

On this page, you can find all software components for HPE StoreVirtual. Regardless of whether you want to download the latest version of HPE StoreVirtual VSA Software for a new deployment or you want to get started with your HPE StoreVirtual 4000 Storage, you can find everything you need linked from this page.

Here is what you need to do to get started:

  1. Download and read the Quick Start Guide
    • Download, install and configure HPE StoreVirtual VSA on your servers
    • Unbox, and connect your HPE StoreVirtual 4000 Storage to network and power
  2. Download and install the HPE StoreVirtual Centralized Management Console on a Windows or Linux server
  3. Create your first management group and cluster

While you will find that HPE StoreVirtual is easy to install and configure, there are a many components that will help you integrate into applications or provide additional functionality to enhance your storage solution. You will find the following components and more by clicking on the “Select” button above:

  • HPE StoreVirtual Application-Aware Snapshot Manager for application-integrated snapshots on StoreVirtual. This component allows you to create snapshots which capture a consistent state of your applications and virtual machines. This component installs the VSS Provider on Windows Server and also integrates VMWare vCenter Server.
  • HPE StoreVirtual Multipathing Extension Module (MEM) for VMware vSphere can reduce latency and improve performance in VMware vSphere environments. The MEM also optimizes data-path traffic in multi-site (or stretch-cluster) configurations.
  • HPE StoreVirtual DSM for Microsoft MPIO can reduce latency and improve performance in Microsoft Windows environments. The DSM also optimizes data-path traffic in multi-site (or stretch-cluster) configurations.
  • HPE StoreVirtual Site Recovery Adapter integrates Remote Copy with VMware Site Recovery Manager 5.x and higher.
  • HPE StoreVirtual Recovery Manager for Windows Files and Folders helps you to recover files quickly from snapshots.
  • HPE StoreVirtual CLiQ is the command-line tool for StoreVirtual. It is typically installed on a Windows Server and can be used for scripting various tasks. The documentation can also be downloaded.

If you’re ready to get started and download the components you need, click “Select” in the upper right corner at the top of this page.

Existing customers: Upgrading to StoreVirtual OS 12.7

StoreVirtual OS 12.7 is the newest release of the StoreVirtual OS.

For a more detailed list of changes, see the StoreVirtual OS 12.7 Release Notes.

Using the Online Upgrade feature in the HPE StoreVirtual Centralized Management Console, you can upgrade to the most recent release of StoreVirtual OS without downloading on this page.

When upgrading an existing installation, upgrade in the following order:

  1. Upgrade the Centralized Management Console
  2. Install/upgrade all client-side components for StoreVirtual OS
  3. Upgrade your storage systems to the latest version of StoreVirtual OS

See the HPE StoreVirtual Storage Upgrade Guide for more information on how to upgrade.

Available Quick Restore DVD downloads

The following DVDs are available as ISO image.

StoreVirtual OS 12.7 Quick Restore DVD for iSCSI and FC products Storage system recovery bootable ISO image for

  • HPE StoreVirtual 4130 Storage,
  • HPE StoreVirtual 4330 Storage,
  • HPE StoreVirtual 4335 Storage,
  • HPE StoreVirtual 4530 Storage,
  • HPE StoreVirtual 4630 Storage,
  • HPE StoreVirtual 4730 Storage,
  • HPE StoreVirtual 4330 FC Storage and
  • HPE StoreVirtual 4730 FC Storage

Additional resources

To download user manuals and other support documentation, go to http://www.hpe.com/support/storevirtualmanuals

To download the latest compatibility matrix, go to HPE SPOCK for StoreVirtual

Click on the below links to download previous StoreVirtual OS

To download the HPE Insight Control Storage Module for vCenter, Click Here

To download Insight Remote Support Standard, Click Here


Additional product information
Product #: StoreVirtualSW
Version: 12.7
Software specification: HPE StoreVirtual Quick Restore DVD (AX694-11019.iso)
HPE StoreVirtual Centralized Management Console for Windows (BM480-10620.exe)
HPE StoreVirtual Centralized Management Console for Linux 32-bit (BM480-10621.bin)
HPE StoreVirtual Centralized Management Console for Linux 64-bit (BM480-10622.bin)
HPE StoreVirtual Application Aware Snapshot Manager Installer (AT004-10556.exe)
HPE StoreVirtual Command Line Interface for Windows CLiQ Installer (BM480-10615.exe)
HPE StoreVirtual SNMP MIBs for StoreVirtual (BM480-10616.zip)
HPE StoreVirtual DSM for Microsoft MPIO Installer (AT004-10544.exe)
HPE StoreVirtual Failover Manager FOM for vSphere OVF (BM480-10617.zip)
HPE StoreVirtual Failover Manager FOM for VMware Player/Workstation (BM480-10618.zip)
HPE StoreVirtual VSA 2014 for vSphere OVF (TA688-10551.zip)
HPE StoreVirtual VSA 2014 and StoreVirtual FOM Installer for Microsoft Hyper-V (TA688-10552.exe)
HPE StoreVirtual VSA 2014 and StoreVirtual FOM Installer for VMware vSphere (TA688-10558.exe)
HPE StoreVirtual KVM VSA and StoreVirtual FOM Installer (TA688-10557.tgz)
HPE StoreVirtual SRA for VMware – SRM5.5 – SRM5.8 – SRM6.0 – SRM6.1 – SRM6.5 (AX696-10593.exe)
HPE StoreVirtual Multipathing Extension Module for VMware vSphere 5.0 (AT004-10534.vib)
HPE StoreVirtual Multipathing Extension Module for VMware vSphere 5.1 (AT004-10535.vib)
HPE StoreVirtual Multipathing Extension Module for VMware vSphere 5.5 (AT004-10550.vib)
HPE StoreVirtual Multipathing Extension Module for VMware vSphere 6.0 (AT004-10551.vib)
HPE StoreVirtual Multipathing Extension Module for VMware vSphere 6.5 (AT004-10547.vib)
HPE StoreVirtual Multipathing Extension Module for VMware vSphere 6.7 (AT004-10558.vib)
HPE StoreVirtual Recovery Manager Installer (AX696-10592.exe)
HPE StoreVirtual Recovery Manager User Guide (AX696-10090.pdf)
HPE StoreVirtual Storage Upgrade Guide (AX696-10070.pdf)
HPE StoreVirtual Command Line Interface User Guide (AX696-10046.pdf)
HPE StoreVirtual Multi-site HA/DR User Guide (AX696-10054.pdf)
HPE StoreVirtual Storage User Guide (AX696-10074.pdf)
HPE StoreVirtual Remote Copy User Guide (AX696-10062.pdf)
HPE StoreVirtual Multipathing User Guide (AX696-10058.pdf)
HPE StoreVirtual Application Aware Snapshot Mgr Deployment Guide (AX696-10050.pdf)
HPE StoreVirtual VSA Installation and Configuration Guide (TA688-63137.pdf)
HPE StoreVirtual Storage Replication Adapter User Guide (AX696-10066.pdf)
HPE StoreVirtual Storage Replication Adapter Readme (AX696-96449.html)
HPE StoreVirtual REST API Reference Guide (AX696-10078.pdf)
HPE P4X00 G2 and HP StoreVirtual 4×30 Storage Sys Recovery Procedures (AX696-10089.pdf)
HPE P4800 G2 Blade Sys Maintenance Guide (AX696-96151.pdf)
HPE StoreVirtual 4000 Storage Quick Start Guide (AX696-96436.pdf)
HPE LeftHand P4000 G1 System Recovery Procedures (AX696-96149.pdf)

0 دیدگاه | سپتامبر 28, 2019

HP StoreVirtual Multi-Path Extension Module (MEM) For VSphere

ارسال شده توسط admin | در دسته بندی Uncategorized

HP StoreVirtual Multi-Path Extension Module (MEM) For VSphere

With the release of LeftHand OS 12.0, HP have introduced a Multi-Path Extension Module to replace the previously recommended path selection policy being ‘Round Robin’ and Storage Array Type Plugin VMW_SATP_DEFAULT_AA .By default Round Robin would send 1,000 I/O down each path , Reference –  Verify Mutilpath Policy IOPS  .

HP StoreVirtual Multipathing Extension Module (MEM) for VMware vSphere – Reduce latency and improve performance in VMware vSphere environments. The MEM also optimizes data-path traffic in multi-site (or stretch-cluster) configurations .

Download MEM for vSphere 6.5

Here we explains with a example of 2 nodes cluster .

we have two cluster nodes, A and B. When the first volume is created it is ‘owned by a master node’ in this case ‘node A’.  When the second volume is created it is owned by ‘node B and so on, as shown below.

  • Volume 1 – Node A
  • Volume 2 – Node B
  • Volume 3 – Node A
  • Volume 4 – Node B

Using the recommended bonding method of ‘Adaptive Load Balancing’ SCSI read and write commands are issued on all NIC’s in the bond which can result in data being accessed from a non-authoritative node, which means a trip across the network to the authoritative node.

VMFocus HP StoreVirtual Diagram

This was rather inefficient and meant that random reads (which are served from disk) could be accessed from a non-authoritative node.  This is where the StoreVirtual Multi-Path Extension Module (MEM) steps in.  It has knowledge on where the data resides and ensures that all:

  • Read I/O’s are always serviced by the storage node that holds the authoritative data.
  • Write I/O’s are always serviced by the storage node that receives a mirror copy of the data ensuring data integrity.  Remaining copies are then forwarded to the remaining storage nodes.

This results in the following data flow architecture.

VMFocus HP StoreVirtual MEM Diagram

The installation guide for HP StoreVirtual Multipathing Deployment Guide is fairly straight forward.  The only issue I ran into was ‘could not find trusted signer’ when trying to install the vib.

This was resolved by adding –no-sig-check to the end of the command esxcli software vib install -v /HPMEM.vib –no-sig-check

Once installed, you will need to change the path selection policy for your datastores to HP_PSP_LH


More – StoreVirtual OS 12.7

0 دیدگاه | سپتامبر 28, 2019

HPE 3PAR StoreServ Block Storage Concepts And Terminology

ارسال شده توسط admin | در دسته بندی Uncategorized

HPE 3PAR StoreServ Block Storage Concepts And Terminology


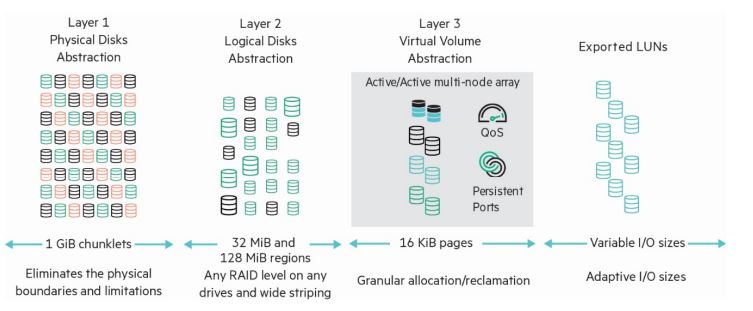
The HPE 3PAR StoreServ array is comprised of the following logical data layers

• Physical disks (PDs)
• Chunklets
• Logical disks (LDs)
• Common provisioning groups (CPGs)
• Virtual volumes (VVs)

The relationship between system data layers is illustrated in Figure 1. Each layer is created from elements of the layer above. Chunklets are drawn from physical disks. Logical disks are created from groups of chunklets. Common provisioning groups are groups of logical disks. And
virtual volumes use storage space provided by CPGs. The virtual volumes are exported to hosts and are the only data layer visible to hosts.

Physical disks

A physical disk is a hard drive (spinning media or Solid State Drive) located in an HPE 3PAR StoreServ drive enclosure.

Cage

Cage is a legacy HPE 3PAR term and is interchangeable with “Drive Enclosure,” “Enclosure” and “Drive Shelf.”

Chunklets

Physical disks are divided into chunklets. Each chunklet occupies physically contiguous space on an FC, NL or SSD disk. On all current HPE 3PAR StoreServ all chunklets are 1 GB. Chunklets are automatically created by the HPE 3PAR OS, and they are used to create logical disks. A chunklet is assigned to only one logical disk.

Logical disks

A logical disk is a collection of chunklets arranged as rows of RAID sets. Each RAID set is made up of chunklets from different physical disks.Logical disks are pooled together in common provisioning groups, which allocate space to virtual volumes.The underlying logical disks are automatically created by the HPE 3PAR OS when you create VVs. The RAID type, space allocation, growth increments, and other logical disk parameters are specified when you create a CPG or can be modified later. The HPE 3PAR StoreServ supportthe following RAID types:

• RAID 1 aka RAID 1+0
• RAID 5 aka RAID 50 (must be enabled from the CLI for NL or FC drives)
• RAID Multi-Parity (MP) aka RAID 6 or double parity
• RAID 0 (must be enabled from the CLI and provides no data protection from failed drives).

Virtual Copy

Virtual Copy is a legacy HPE 3PAR term and is interchangeable with “Snapshot.”

CPGs (Common provisioning groups)

A CPG is a template for the creation of logical disks that allocate space to virtual volumes on demand. A CPG allows up to 65,536 virtual volumes to share a CPG’s assigned resources. You can create fully provisioned virtual volumes (FPVVs), Thinly Deduped Virtual Volumes (TDVVs) and
Compressed VVs that draw space from a CPG’s logical disks. It is important to note that if no volumes of any type have been created in a CPG, it consumes no space.

VVs (Virtual volumes)

VVs (Virtual volumes) draw their resources from the LDs in CPGs and are exported as LUNs (Logical Unit Numbers) to hosts. Virtual volumesare the only data layer visible to the hosts. You can create clones (previously known as full copies) or snapshots (previously known as virtual
copies) of virtual volumes. Clones remain available if the original base volume becomes unavailable. VVs can be created using the CPGs created at installation time or user defined CPGs.

Exporting virtual volumes

For a host to see a VV, the volume must be exported as a LUN. Volumes are exported by creating VV-LUN pairings (VLUNs) on the system.When you create VLUNs, the system produces both VLUN templates that establish export rules, and active VLUNs that the host sees as LUNs as attached disk devices. A VLUN will be created for each path available to the host for each VV exported.

FPVVs (Fully provisioned virtual volumes)

A FPVV virtual volume is a volume that uses logical disks that belong to a CPG. Unlike TPVVs or TDVVs, fully provisioned virtual volumes have a set amount of user space that is allocated for user data. The fully provisioned volume size is allocated and consumed at the time of provisioning, size limits range from 256 MB to 64 TB (Compressed and Dedupe VVs have a maximum size of 16 TiB). The volume size can be increased at any time (provided free space is available) up to the maximum 64 TiB size without any downtime however, the VV size cannot be decreased below the initial allocation.

TPVVs (Thinly provisioned virtual volumes)

A TPVV is a volume that uses logical disks that belong to a CPG. TPVVs, TDVVs, or DECO VVs (deduped and compressed) associated with the same CPG draw space from those CPGs’ LDs as needed, allocating space on demand in 16 KiB increments for each VV. As the volumes that draw
space from the CPGs’ LDs (including compressed and deduped) require additional storage the HPE 3PAR OS automatically creates additional logical disks or expands the size of existing LDs and adds them to the CPG until the CPG reaches a user-defined growth limit, if one has been set,
or the system runs out of space.

TDVVs (Thinly deduped provisioned virtual volumes)

In addition to the features and functionality of TPVVs; TDVVs go through an additional process before allocating space on a disk. All data writes with a block size 16 KiB or greater have a unique hash generated and the resulting value is compared to a hash lookup table to determine if the
data has already been stored. If the data is a duplicate of existing data, an entry is added to the destination volume’s lookup table but no data is written. Otherwise it is written to disk. For more information on this, refer to the HPE 3PAR Thin Technologies white paper located here.

Clones (also known as Physical Copies)

A clone duplicates all the data from a base volume to a destination volume. The base volume is the original volume that is copied to the destination volume. The clone on the destination volume remains available if the original base volume becomes unavailable.A clone requires the destination volume have usable capacity equal to or greater than the usable capacity of the base volume being cloned. As of HPE 3PAR OS 3.2.1 the clone can be exported immediately after creation, while the data copy continues in the background.

Snapshots (also known as Virtual Copy)

Unlike a clone, which is a block for block duplicate of an entire volume, snapshots preserve a bitmap of a VV at a particular point in time.Updates to VVs are written to SD (Snap Data) space and the bitmap (Snap Admin space) of the VV.

Snapshots for FPVVs, TPVVs, dedupe compressed and DECO clones and other snapshots are created using copy-on-write techniques available(aka Virtual Copy) snapshots for TDVVs are created using ROW (Redirect On Write). Hundreds of snapshots of each virtual volume can becreated assuming that there is sufficient storage space available. It is worth noting that snapshots do not consume any space unless data on the base volume has been updated and the original data copied to the SD (Snap Data) space. Changed data is copied only once regardless of thenumber of snapshots taken. Snapshots are particularly useful for test/dev environments as they can be created in seconds and exported while not effecting production data. Also, testers and developers can be granted the ability to create snapshots while not having any ther administrative privileges, lowering administration requirements (see the HPE 3PAR CLI guide for correct usage for granting the updatevv privilege). Snapshots can now be updated without the requirement to unexport and re-export the VV. For more information on snapshot/Virtual Copy technologies refer to the white paper here .

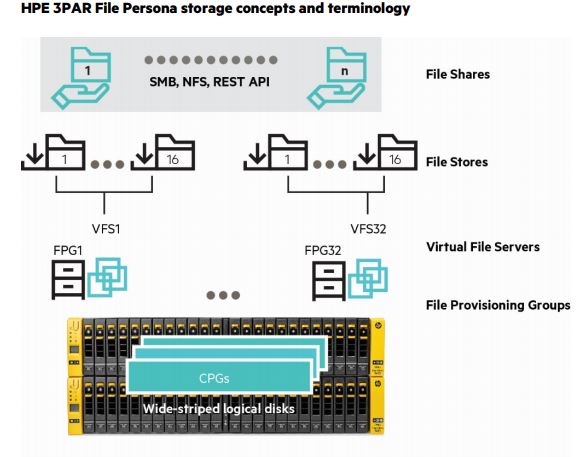
File Provisioning Group

A File Provisioning Group (FPG) is an instance of the HPE intellectual property Adaptive File System. It controls how files are stored and retrieved. Each FPG is transparently constructed from one or multiple Virtual Volumes (VVs) and is the unit for replication and disaster recovery for File Persona Software. There are up to 16 FPGs supported on a node pair.

Virtual File Server

A Virtual File Server (VFS) is conceptually like a server; as such it presents virtual IP addresses to clients, participates in User Authentication Services and can have properties for such characteristics as user/group Quota Management and Antivirus policies.

File Stores

File Stores are the slice of a VFS and FPG where snapshots are taken, capacity Quota Management can be performed, and Antivirus Scan Services policies customized.

File Shares

File Shares are what provide data access to clients via SMB, NFS, and the Object Access API, subject to the share permissions applied to them

0 دیدگاه | سپتامبر 28, 2019