How To Install Or Update The License On 3PAR Storage System

ارسال شده توسط admin | در دسته بندی Uncategorized

There are two Ways you can apply the license to 3PAR Storage one is from GUI and other is from CLI .
Before proceeding the steps make sure you have proper license file or license detils .You can obtain the license file from HP reseller or HP Portal or Hp Account Manager

In this post we are sharing information how can you apply license to you 3 PAR storage , follow below procedure

How to Apply License From GUI

Open HP 3PAR Management Console and Login

After Login On the Left pane you can see your 3PAr storage system

Right Click on the Storage System and select Set license

Once the License window opens you will have two option to add license , select the appropriate way and select the Agree to the terms and conditions and Click OK 

License File  – Browse the license file FILE.DAT which we received form HPE or Downloaded from HPE License Site

License Key  – License Key is a combination of numbers and letter you can copy form your source and paste there .

Once Apply the License you can Navigate to the software tab and check the license features from there .


You can check the License status from the CLI  by entering the command showlicense , check below image you can see before and after applying license difference

How to Apply License From CLI

Open the 3PAR Console using putty

Use the command setlicense to apply new license to upgrade

Once enter the set license command it will ask you confirm that agree to the terms and conditions by selecting Y for proceed to add license .

You can add the license keys on the CLI window and enter once again as empty line and license will applied


Click here to access the portal for HPE Licensing.

OR

Click here to access the portal for License Support Centers.

0 دیدگاه | سپتامبر 28, 2019

EMC VNX Components And Their Purpose

ارسال شده توسط admin | در دسته بندی Uncategorized

EMC VNX Components And Their Purpose


Components and their purpose

Standby Power Supply – SPS – This is a 1u uninterruptible power supply designed to hold the Storage processors during a power failure for long enough to write any data in volatile memory to disk.

Disk Processor Enclosure – DPE (VNX5100/5300/5500/5200/5400/5600/5800/7600 models) – This is the enclosure that contains the storage processors as well as the Vault Drives and a few other drives. It contains all connections related to block level storage protocols including Fiber Channel and iSCSI.

Storage Processor Enclosure – SPE (VNX5700/7500/8000 models) – This is the enclose that contains the storage processors on the larger VNX models. It is in place of the DPE mentioned above.

Storage Processor – SP –  Usually followed by “A” or “B” to denote if which one it is, all VNX systems have 2 storage processors. It is the job of the storage processor to retrieve data from the disk when asked, and to write data to disk when asked. It also handles all RAID operations as well as Read and Write caching. iSCSI and additional Fiber Channel ports are added to the SP’s using UltraFlex modules.

UltraFlex I/O Modules – These are basically PCIe Cards that have been modified for use in a VNX system. They are fitted into a metal enclosure that is then inserted into the back of the Storage Processors or Data Movers, depending on if it is for Block or File use.

Control Station – CS –  Normally preceded by “Primary” or “Secondary” as there are at least 1, but most often 2 control stations per VNX system. It is the job of the control station to handle management of the File or Unified components in a VNX system. Block only VNX arrays do not utilize a control station. However in a Unified or File only system the Control stations run Unisphere and pass any and all management traffic to the rest of the array components.

 Data Mover Enclosure – Blade Enclosure – This enclosure houses the data movers for file and unified VNX arrays.

Data Movers – X-Blades – DM – Data movers  (aka X-Blades) connect to the storage processors over dedicated fiber channel cables and provide File (NFS, pNFS, and CIFS) access to clients. Think of a data mover like a linux system which has SCSI drives in it, it then takes those drives and formats them with a file system and presents them out one or more protocols for client machines to access.

Disk Array Enclosure – DAE – DAE’s come in several different flavors, 2 of which are depicted in the quick reference sheet. One is a 3u – 15 disk enclosure which holds 15 – 3.5″ disk drives; the second is a 2u – 25 disk enclosure which holds 25 – 2.5″ disk drives; and finally the third is a 4u – 60 disk enclosure which holds 60 – 3.5″ drives in a pull out cabinet style enclosure. The third type is the more rare and are not normally used unless rack space is at a premium.

0 دیدگاه | سپتامبر 28, 2019

FAST CACHE – EMC VNX

ارسال شده توسط admin | در دسته بندی Uncategorized

FAST CACHE – EMC VNX

EMC FAST Cache technology gives a performance enhancement to the VNX Storage Array by adding FLASH drives as a Secondary Cache, working hand-in-hand with DRAM Cache and enhancing overall Storage Array performance. EMC recommend firstly using available Flash Drives for FAST Cache and then adding Flash Drives as a tier to selected FAST VP pools as required. FAST Cache works with all VNX systems (And also CX4) and is activated by installing the required FAST Cache Enabler. FAST Cache works with traditional Flare LUNs and VP Pools.

Note: FAST Cache is enabled at the Pool wide level and cannot be selective for specific LUNs within the Pool.

The initial configuration is quite simple, after adding the required quantity of drives you can create FAST Cache through the System Properties’ console in Unisphere, which will enable FAST Cache for system wide use:

FC

Create and monitor the initialization status of FAST Cache Using Navicli

naviseccli -h SPA_IP cache -fast -create –disks disks -mode rw -rtype r_1
Check on the status of FAST Cache creation:
naviseccli -h SPA_IP cache -fast -info -status

To enable or disable FAST Cache on a specific VP_POOL from Navicli use below 

naviseccli -h SPA_IP storagepool -modify -name “Pool_Name” -fastcache off

naviseccli -h SPA_IP storagepool -modify -name “Pool_Name” -fastcache on

Check what Pools have FAST Cache enabled/disabled

naviseccli -h SPA_IP storagepool -list -fastcache

Note: FAST Cache configuration requires any modification then it first needs to be disabled. By disabling (destroying) FAST Cache all dirty blocks are flushed back to disk; once FAST Cache has completed disabling then you may re-create FAST Cache with your new configuration.

Configuration Options

FAST Cache configuration options range from 100GB on a CX4-120 to 4.2TB of FAST Cache on a VNX-8000.

CX4 VNX1  VNX2
CX4-120 – 100GB VNX 5100 – 100GB VNX 5200 – 600GB
CX4-240 – 200GB VNX 5300 – 500GB VNX 5400 – 1000GB
CX4-480 – 800GB VNX 5500 – 1000GB VNX 5600 – 2000GB
CX4-960 – 2000GB VNX 5700 – 1500GB VNX 5800 – 3000GB
VNX 7500 – 2100GB VNX 7600 – 4200GB
VNX 8000 – 4200GB

FAST-Cache-MAXs

FAST Cache drives are configured as RAID-1 mirrors and it is good practice to balance the drives across all available back-end buses; this is due to the fact that FAST Cache drives are extremely I/O Intensive and placing more than the recommended maximum per Bus may cause I/O saturation on the Bus. Amount of FAST Cache drives per B/E Bus differs for each system but ideally for a CX/VNX1 system aim for no more than 4 drives per bus and 8 for a VNX2. It is best practice on a CX/VNX1 to avoid placing drives on the DPE or 0_0 that will result in one of the drives being placed in another DAE, for example DO NOT mirror a drive in 0_0 with a drive in 1_0.

The order the drives are added into FAST Cache is the order in which they are bound, with the:
first drive being the first Primary;
the second drive being the first Secondary;
the third drive being the next Primary and so on…

Check the internal private RAID_1 Groups of FAST Cache by from Navicli using below command 

naviseccli -h SPA_IP getrg –EngineeringPassword

Note: Do not mix different drive capacity sizes for FAST Cache, either use all 100GB or all 200GB drive types.

Also for VNX2 systems there are two types of SSD available:

FAST Cache SSD  – These are single-level cell (SLC) Flash drives that are targeted for use with FAST Cache. These drives are available in 100GB and 200GB capacities and can be used both as FAST Cache and as TIER-1 drives in a storage pool.

FAST VP SSD  – These are enterprise Multi-level cell (eMLC) drives that are targeted for use as TIER-1 drives in a storage pool (Not supported as ‘FAST Cache’ drives). They are available in three flavors 100GB, 200GB and 400GB.

FAST Cache Internals

FAST Cache is built on the Unified LUN technology; thus the Data in FAST Cache is as secure as any other LUN in the CX/VNX array. FAST Cache is a nonvolatile storage that survives both power and SP failures and it does not have to re-warm after a power outage either.

There will be a certain amount of DRAM allocated during FAST Cache creation for the IO tracking of FAST Cache known as the ‘Memory Map’. This FAST Cache bitmap is directly proportional to the size of the FAST Cache. The memory allocation is something in the region of 1MB for every 1GB of FAST Cache created. So when FAST Cache is being enabled FLARE will attempt to grab approx 1/3rd the required memory from Read cache and 2/3rds from the Write cache and then re-adjusts the existing DRAM read and write caches accordingly.

With a compatible workload; FAST Cache increases performance by reducing the response time to hosts and provides higher throughput (IOPS) for busy areas that may be under pressure from drive or RAID limitations. Apart from ‘Storage Processors’ being able to cache read and write I/Os; the Storage Processors on the VNX also coalesce writes and pre-fetch reads to improve performance. However, these operations generally do not accelerate random read-heavy I/Os and this is where FAST Cache helps. FAST Cache monitors the storage processors’ I/O activity for blocks that are read or written to multiple times, with the third IO to any block within a 64K extent getting scheduled for promotion to FAST Cache, promotion is handled the same way as writing or reading an IO to a LUN. The migration process operates 24×7 using the ‘Least Recently Used algorithm’ in order to determine which data stays and which goes. The writes continue to be written to DRAM write cache but with FAST Cache enabled those writes are flushed to the Flash drives and so increasing flush speeds.

One important thing to note is that while performance of the VNX increases and IOPS figures increase with workload demands there will be an increase in the SP CPU utilization and this should be monitored. There are recommended guidelines on max throughput figures for particular arrays… more on this later.
It is important to know the type of workload on your LUN; as an example, log files are generally written and read sequentially across the whole LUN, in this scenario the LUN would not be a good candidate for FAST Cache as Flash drives are not necessarily better at serving large block sequential I/O when compared to spinning drives. Also Large block sequential I/O workloads are better served by having large quantities of drives, promoting this type of data to FAST Cache will normally result in the data being served by a lesser quantity of drives thus resulting in a performance reduction. Avoiding using FAST Cache on unsuitable LUNs will help to reduce the overhead of tracking I/O for promotion to FAST Cache.

Best Practice

Below are the  conditions that you should factor when deciding if FAST Cache will be a good fit for your environment:

• VNX Storage Processor Utilization is under 70-percent
• There is evidence of regular forced Write Cache Flushing
• The majority I/O block size is under 64K (OLTP Transactions are typically 8K)
• The disk utilization of RAID Groups is consistently running above 60-70%
• Your workload is predominately random read I/O
• Your production LUNs have a high percentage of read cache misses
• Host response times are unacceptable

0 دیدگاه | سپتامبر 28, 2019

How To Use Unisphere – EMC VNX

ارسال شده توسط admin | در دسته بندی Uncategorized

How To Use Unisphere – EMC VNX

Unisphere is web-enabled software for remote management of storage environment. It has all the extras, like widgets and sortable tables, wizards etc. Unisphere Management Server runs on the Storage Processor (SP) and the Control Station.

To launch a Unisphere you can fire up an Internet browser and type the IP address of either one of the SPs or the Control Station.

Note:- Java should be installed and available on the system / browser .

First Login

Default login/password for EMC VNX Unified system is:
login: sysadmin
password: sysadmin

VNXe

login: admin
password: Password123#

Administration of VNX is performed with the Unisphere graphical user interface (GUI). Administration of the VNX system can also be performed with a command line interface (CLI). File enabled VNX systems use a command line interface to the Control Station for file administrative tasks. Block enabled systems have a host-based Secure CLI software option available for block administrative tasks. The CLI can be used to automate management functions through shell scripts and batch files.

Authentication Scopes

There are three different administrative user auth scopes .

Global authentication scope  :  It is used when the VNX is configured to be a member of a Storage Domain. All the systems within the domain can be administrated using a single sign-on with a global account.
Local authentication scope : It  is used to manage a specific system only. Logging into a system using a local user account is recommended when there are a large number of systems in the domain.
LDAP authentication scope : It  is used when the VNX is configured to “bind” to an LDAP domain. The VNX performs an LDAP query to the domain to authenticate the administrative users.

Storage Domains

By default each VNX is its own Storage Domain.

Domain Members are:
* SPA
* SPB
* Control Station
* System managed by Unisphere session to any member

A VNX system can be manager using a Unisphere session to any member of the Storage Domain. The system also includes a default “sysadmin” Global user account in the Domain, which is configured with the Administrator role.

Adding VNX system to Domain

 To add a VNX system into an existing VNX local domain, in Unisphere navigate to the System List, and perform Add operation. You have to provide an SP (Storage Processor) IP address of the VNX system to be added. When adding a system into the domain, the system being added will be removed from any of its existing domain configurations. Obviously you will also be asked for credentials to login to the VNX system being added. Once the VNX system is added, it will be displayed in the System List page.

0 دیدگاه | سپتامبر 28, 2019

EMC Unisphere Overview

ارسال شده توسط admin | در دسته بندی Uncategorized

EMC Unisphere Overview


We already shared a post about Unisphere , how to use Unisphere . Here i want to share more  , how you can start working with EMC Unisphere.

Launch Unisphere

As I mentioned in my previous post, easiest way to launch is to fire up and Internet Browser and type the IP address of Control Station.

When you see login screen just login with your credentials. If you log in for the first one you can probably login with the standard credentials:

VNX

login: sysadmin
password: sysadmin

VNXe

login: admin
password: Password123#

First Login you will see an dashboard like below image .

I have added some comments mentioned in red. First thing you have to notice is that you see a Dashboard. If you have more then one VNX in the domain you are actually not yet login to the specific VNX, but for the overall dashbord (of course it depends on the Scope of your credentials, but I assume you login as a sysadmin).

If you would like to work / manage single storage system you have to choose it, either from drop-down list in top left corner, or click on the hostname below the menu.

Storage Array

Once you have selected a desired VNX Array your Dashbord should change a little on the same window . You have more specific information about your Array. First you see all important (recent) system alerts. On the right top window you should see basic information, hint: here you will find serial number which is required often to work with EMC .

Menu options

Each menu have several options. You can either click on the top menu choise (System,Storage,Host,Data Protection etc.) or just hover over it and wait to more options to pop up. System have three choices:

  •  Hardware – here you can find all hardware information, from single harddrive information to FAN status.
  •  Monitoring and Alerts – all alerts are here, you can gather SP Event Logs, Notifications, Statistics and more, even schedule sending e-mail with statistics.
  •  Reports – place where you can generate reports

Storage

The number of options available here may vary depends on version, licenses etc. For example if you have VNX for file, you would see here much more .In this section you can actually provision Storage, create LUN’s or Storage Pools, etc.

Hosts

In this tab the important section is Storage Groups where you can define new, delete old or modify already existing Storage Groups. To use/ create a Storage Group you should  have a Host, list of hosts you can find in Host List. To add a Host you need to have Initator on the host side .

0 دیدگاه | سپتامبر 28, 2019

Snapshots – EMC VNX

ارسال شده توسط admin | در دسته بندی Uncategorized

Snapshots – EMC VNX


VNX Snapshots is a feature introduced in VNX for Block OE Release 32. It was created to improve on the existing SnapView Snapshot functionality by better integrating with pools. In fact, VNX Snapshots can only be used with pool LUNs.LUNs that are created on physical RAID groups, also called Classic LUNs,support only SnapView Snapshots. This restriction exists because VNX Snapshots require pool space as part of the technology.

Note: SnapView Snapshots are compatible with pool LUNs. VNX Snapshots and SnapView Snapshots can coexist on the same pool LUN.

VNX Snapshots support 256 writeable snaps per pool LUN. It supports Branching, also called Snap of a Snap. A Snap of a Snap hierarchy cannot exceed 10 levels. There are no restrictions to the number of branches, as long as the total number of snapshots for a given primary LUN is within 256, which is the hard limit.

Consistency Groups are also supported with this feature. Several pool LUNs can be combined into a Consistency Group and snapped concurrently.

How Snapshots works

How Snapshots work VNX Snapshots use redirect on write (ROW) technology. ROW redirects new writes destined for the primary LUN to a new location in the storage pool. Such an implementation is different from copy on first write (COFW) used in SnapView, where the writes to the primary LUN are held until the original data is copied to the reserved LUN pool to preserve a snapshot.

Here we illustrates the main difference between SnapView Snapshots and VNX Snapshots. VNX Snapshot technology writes the new data to a new area within a pool, without the need to read/write to the old data block. This improves the overall performance compared to SnapView.

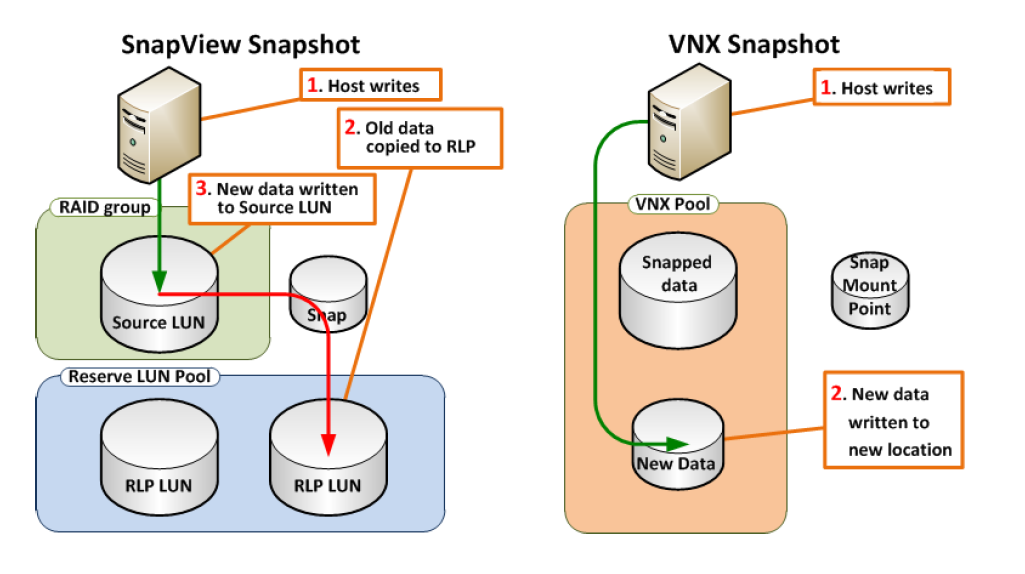
SnapView write vs. VNX Snapshot write

Similarly, during a read from a snapshot, the snapshot’s data is not constructed from two different places as shown below

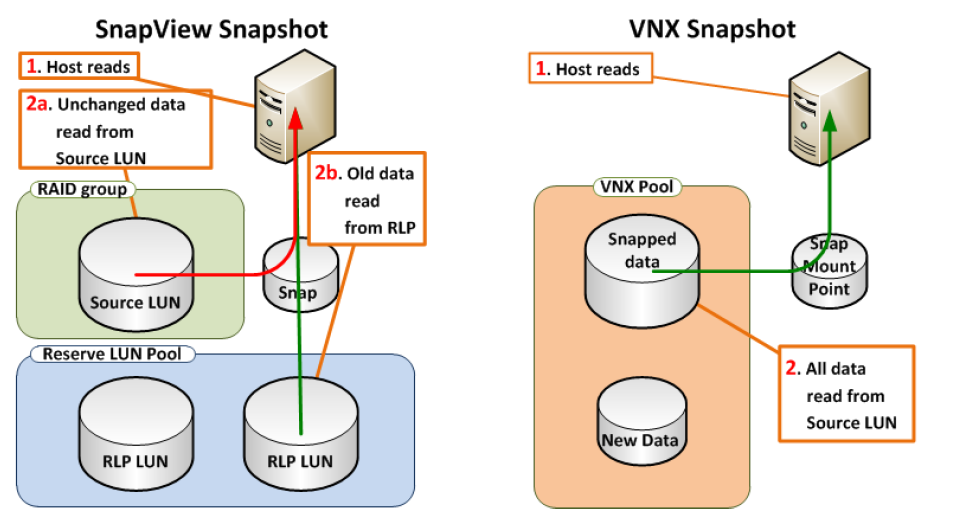
SnapView read vs. VNX Snapshot read

Snapshot granularity

Every VNX Snapshot has 8 KB block granularity. This means that every write occupies at least 8 KB on the pool. The distribution of the 8 KB blocks within a 256 MB slice (1GB in VNX OE for Block R32) is congruent with the normal thin write algorithm.

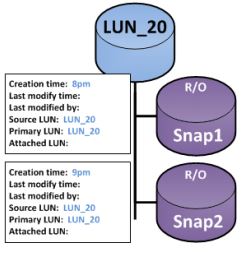
Check below example  , A LUN is snapped with a few blocks of data. The new snapshot points at those blocks, just like the primary LUN.

VNX Snapshot pointing at the same blocks with the LUN at creation time

After a few moments, the primary LUN may receive an I/O that overwrites block A. The first snapshot continues pointing to the original set of blocks A, B, C, and D. After Snap2 is taken, it points to A`, B, C and D.The next primary LUN I/O overwrites block D, and it now points to A`, B,C, and D`.

VNX Snapshots point at unchanged blocks, Primary LUN is using new blocks

Snapshots and Thick LUN

When a VNX Snapshot is created on a Thick LUN, portions of its address space are changed to indirect mode. In other words, when writes come in to the Snapped Thick LUN, the LUN starts converting address mapping from direct to 8 KB blocks for each portion of the Thick LUN being written.

Note: Thick LUN remains to be classified as Thick in the CLI and GUI.

The Thick LUN remains in an indirect mode while it has VNX Snapshots.When the last snapshot of the Thick LUN is removed, the mode automatically reverts to direct. The process of reverting to direct mode is not instantaneous, and is performed in the background. The process can be aborted by creating a new VNX Snapshot on the LUN.

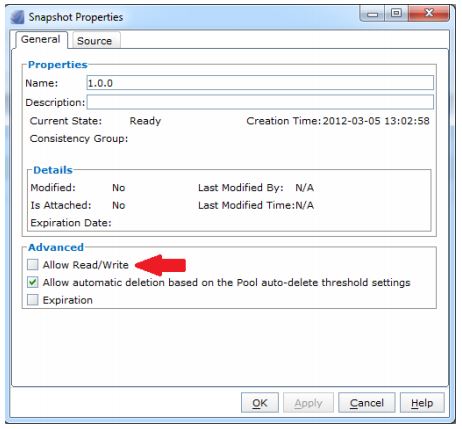
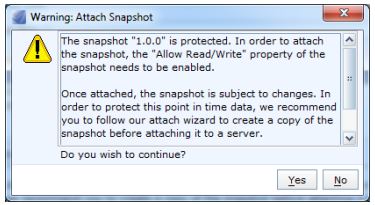
VNX Snapshots are a part of the storage pool. A snapshot does not consume space from the pool, until the new data is written to the primary LUN or to the snapshot itself.Snapshot Mount Point Snapshot Mount Point (SMP) is a LUN-like container. It is used to emulate a typical LUN, but provides the ability for the host to write to snapshots and to change snapshots without the need to rescan the SCSI bus on the client.

Snapshot Mount Point

Snapshot Mount Point (SMP) is a LUN-like container. It is used to emulate a typical LUN, but provides the ability for the host to write to snapshots and to change snapshots without the need to rescan the SCSI bus on the client.

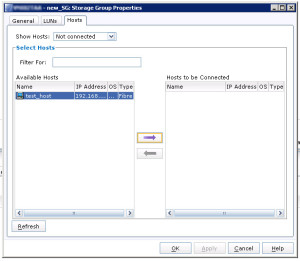
A SMP is created for snapshots of a specific LUN. This means that each SMP can be used only for snapshots of a single primary LUN.To enable access to hosts, SMPs must be provisioned to storage groups just like any typical LUN .

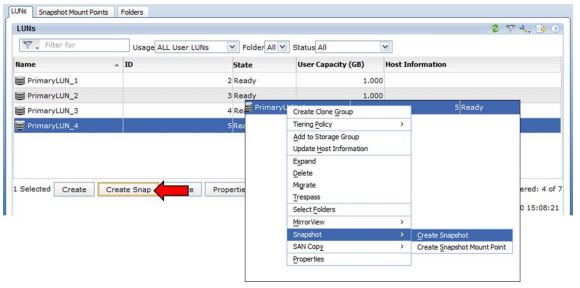
See How to Create a Snapshot

0 دیدگاه | سپتامبر 28, 2019

Create Snapshot – EMC VNX

ارسال شده توسط admin | در دسته بندی Uncategorized

Create Snapshot – EMC VNX

Creating a snapshot does not consume any pool space. The space starts being used when new writes to the primary LUN or to the snapshot itself arrive. Snapshots have a granularity of 8 KB, and their blocks are tracked just like the blocks in thin LUNs. Every snapshot must have a primary LUN, and that property never changes.A primary LUN cannot be deleted while it has snapshots. In Unisphere,You can delete a LUN that has snapshots by selecting an optional setting that deletes the snapshots first.

A pair of VNX Snapshots

Before creating a snapshot, use the SnapCLI utility to flush the host buffers.

:: Windows
SnapCLI flush -o G:

Create a snapshot

  • In Unisphere, select Storage > LUNs

Create VNX Snapshots in Unisphere

  • Click Create Snapshot or right-click the primary LUN

# To create snapshot in the CLI

naviseccli snap -create -res 1 -name “cli_snap” -descr “snap created via CLI”
# ^^^
# LUN ID

Note: When a snapshot is first created, it is write-protected

Unisphere view of the VNX Snapshot write protection

When you try to attach a snapshot that has the Allow Read/Write option disabled, Unisphere automatically enables it and displays a warning.

Unisphere VNX Snapshot Attach warning

If a Snapshot is attached from the CLI, then the -allowReadWrite property must be set to “Yes”. Therefore, you must manually modify it prior to an attach command.

# To modify a snap in the CLI

naviseccli snap -modify -id “cli_snap” -allowReadWrite yes

See How to create Snapshot Mount Point

0 دیدگاه | سپتامبر 28, 2019

Connect A Host To EMC VNX

ارسال شده توسط admin | در دسته بندی Uncategorized

Connect A Host To EMC VNX

Here are explaining about how we can register the host manually to EMC VNX storage system.

Note: If the host is not powered on ,we will not see it in our hosts available. Most scenario host would be probably first connected and either auto-registered with Host Agent or Unisphere Server Utility (or similar software), or we would have to manually register the host.

Go to Host section in menu and choose Initiators.


All hosts connected to SAN have Initiators (at least one). Initiator is a pair of  WWN/IQN address and Storage Processor Port that it’s connected to ,You can see a table similar to below image

It is  important to note that : One initiator might be only in one Storage Group ,  No exception. The rule is that one host can be in one Storage Group. From this table you will notice that usually one host have more than one initiator, therefore there is a trick to put single host in more than one Storage Group.

Check below example how usually the connection between Host and Storage Array looks like:

Most often host have at 4 Initiators per host:

  1. host_HBA_1 connected to Port_X in Storage Processor A
  2. host_HBA_1 connected to Port_Y in Storage Processor B
  3. host_HBA_2 connected to Port_Z in Storage Processor A
  4. host_HBA_2 connected to Port_U in Storage Processor B

This configuration we should have basically no single point of failure to break the connection between storage and Host. Of course I assume that there are two Fabrics as well.

We will add a host with Single Initiator connected to Storage Processor A port 5. At the bottom of the screen you should notice an option Register.

As you can see the WWN (WWnN:WWpN)  in example is not a valid address, but it’s good enough for our example. I have selected port A-5, Failover Mode Active-Active (ALUA), and register it as a new Host called test_host with some local IP address.

Afte rthe Success message , click OK.

We have created a new Host. Of course it’s not connected. But assuming that we have put valid WWN once the host is connected to the selected port (in my example SPA-5) it will be up and running.

Now we can see the Host with one initiator. As you can notice it’s a part of ~management Storage Group. That it’s actually a special SG, where all Initiators are put if that are in no “real” Storage Group.To verify that newly added Host exist go to Host List option (also in Host menu)

Since it is Manually Registered. We have our new host added to the Storage System (not physically connected, but that’s OK).

Next We have to have Configure Storage Group present the LUN to Host ,  See How to Create Storage Group

0 دیدگاه | سپتامبر 28, 2019

Create A Storage Group In EMC VNX

ارسال شده توسط admin | در دسته بندی Uncategorized

Create A Storage Group In EMC VNX


To Create a Storage Group simply go to Host > Storage Group section. Click Create and all you have to give is a name:

Create Storage Group

I have created the Storage Group called new_SG. Once you hit OK you will be prompted with question to confirm the creation of group .

new Storage Group

As you can see, the job status is success and we can actually straight away say “Yes, I want to add LUNs and/or connect host”Let’s do it. next sreen you can see is:

Adding LUNs to Storage Group

Now you will have the option to Add LUN(s). Check for the LUN you have created and  click on it, and click ‘Add’ on the right side . See Post – Create LUN if you need help on that

Next is  an important thing  ,Choosing Host LUN ID. As you can see I didn’t put any value, the storage system will auto assign the Host LUN ID with the next available (in this case it will be 0, since there is no LUN present in this Storage Group). To learn more about HLU/ALU again, take a look at post LUN masking and Storage Groups.

You can click OK, or Apply. If you plan to attach some hosts as well, just click Apply, which will add the selected LUN and will not close the window. Connecting Host is just another tab on the same window.

Connect Host to Storage Group

Now you have to do is select from hosts available in left field and move it to the right. Note that you can filter for Host Already connected, but if you choose from hosts that are already connected you will remove the host from the current Storage Group and move it to the new one . (if you are not aware of that , Please don’t try in Production ).

0 دیدگاه | سپتامبر 28, 2019

Create A LUN In EMC VNX

ارسال شده توسط admin | در دسته بندی Uncategorized

Create A LUN In EMC VNX


Create a LUN

First you have to log in to EMC Unisphere and choose the VNX array you wish to work with. Once it’s done, go to the top menu and select a Storage section, choose LUN

Once you choose the option you should see list of all your LUNs already created and at the bottom of the screen you will find ‘Create’ button

If need you can  personalize the view of the table or export it for example to CSV and more.

Click Create button you will see new pop-up window like below image:

Create new LUN

Your view won’t be identical,it all depends on your configuration. In that example there is a pool created from RAID6 groups called ‘Pool-Bronze’.

The basic things you should fill and understand is :

  • Do you want Pool LUN or RAID Group LUN?
  • Should the LUN be thin provisioned, should it be deduplicated?
  • what should be the capacity, and what should be the LUN ID

Here  we are going to create a Pool LUN, with size of 100 GB. For that I will use already defined and already created Storage Pool called  Pool-Silver. I will make the pool Thin (which in few words means that the LUN will not take 100GB of my available capacity but more or less the size that is actually used by a host, so at the beginning it will be very small). I will choose the LUN ID to 43023 (just an example, not any particular reason for that – but you have to remember that LUN ID is unique for a storage system. And I will call the lun testlun_1. Again the LUN Name is unique as well.

Create new LUN

After you click ‘Apply’ you will be promped for confirmation, and once given, the LUN should be created in couple of seconds, with information ‘success’.

Next You have connect the host to Storage array for mapping the LUN we created , You can Visit Page Conenct Host to EMC VNX for this .

Next You have to Create Storage Group and add the Host and LUN to this , To Learn how to d that Visit Create a Storage Group

0 دیدگاه | سپتامبر 28, 2019