| Product details and specifications |
|---|
|
||||||||||||||||||||||||||||||||
ارسال شده توسط admin | در دسته بندی Uncategorized
| Product details and specifications |
|---|
|
||||||||||||||||||||||||||||||||
0 دیدگاه | سپتامبر 28, 2019
ارسال شده توسط admin | در دسته بندی Uncategorized
With the release of LeftHand OS 12.0, HP have introduced a Multi-Path Extension Module to replace the previously recommended path selection policy being ‘Round Robin’ and Storage Array Type Plugin VMW_SATP_DEFAULT_AA .By default Round Robin would send 1,000 I/O down each path , Reference – Verify Mutilpath Policy IOPS .
HP StoreVirtual Multipathing Extension Module (MEM) for VMware vSphere – Reduce latency and improve performance in VMware vSphere environments. The MEM also optimizes data-path traffic in multi-site (or stretch-cluster) configurations .
Download MEM for vSphere 6.5
Here we explains with a example of 2 nodes cluster .
we have two cluster nodes, A and B. When the first volume is created it is ‘owned by a master node’ in this case ‘node A’. When the second volume is created it is owned by ‘node B and so on, as shown below.
Using the recommended bonding method of ‘Adaptive Load Balancing’ SCSI read and write commands are issued on all NIC’s in the bond which can result in data being accessed from a non-authoritative node, which means a trip across the network to the authoritative node.

This was rather inefficient and meant that random reads (which are served from disk) could be accessed from a non-authoritative node. This is where the StoreVirtual Multi-Path Extension Module (MEM) steps in. It has knowledge on where the data resides and ensures that all:
This results in the following data flow architecture.

The installation guide for HP StoreVirtual Multipathing Deployment Guide is fairly straight forward. The only issue I ran into was ‘could not find trusted signer’ when trying to install the vib.

This was resolved by adding –no-sig-check to the end of the command esxcli software vib install -v /HPMEM.vib –no-sig-check
Once installed, you will need to change the path selection policy for your datastores to HP_PSP_LH

More – StoreVirtual OS 12.7
0 دیدگاه | سپتامبر 28, 2019
ارسال شده توسط admin | در دسته بندی Uncategorized
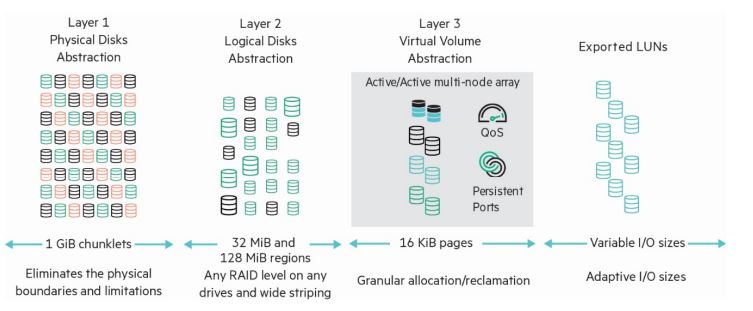
The HPE 3PAR StoreServ array is comprised of the following logical data layers
• Physical disks (PDs)
• Chunklets
• Logical disks (LDs)
• Common provisioning groups (CPGs)
• Virtual volumes (VVs)
The relationship between system data layers is illustrated in Figure 1. Each layer is created from elements of the layer above. Chunklets are drawn from physical disks. Logical disks are created from groups of chunklets. Common provisioning groups are groups of logical disks. And
virtual volumes use storage space provided by CPGs. The virtual volumes are exported to hosts and are the only data layer visible to hosts.
A physical disk is a hard drive (spinning media or Solid State Drive) located in an HPE 3PAR StoreServ drive enclosure.
Cage is a legacy HPE 3PAR term and is interchangeable with “Drive Enclosure,” “Enclosure” and “Drive Shelf.”
Physical disks are divided into chunklets. Each chunklet occupies physically contiguous space on an FC, NL or SSD disk. On all current HPE 3PAR StoreServ all chunklets are 1 GB. Chunklets are automatically created by the HPE 3PAR OS, and they are used to create logical disks. A chunklet is assigned to only one logical disk.
A logical disk is a collection of chunklets arranged as rows of RAID sets. Each RAID set is made up of chunklets from different physical disks.Logical disks are pooled together in common provisioning groups, which allocate space to virtual volumes.The underlying logical disks are automatically created by the HPE 3PAR OS when you create VVs. The RAID type, space allocation, growth increments, and other logical disk parameters are specified when you create a CPG or can be modified later. The HPE 3PAR StoreServ supportthe following RAID types:
• RAID 1 aka RAID 1+0
• RAID 5 aka RAID 50 (must be enabled from the CLI for NL or FC drives)
• RAID Multi-Parity (MP) aka RAID 6 or double parity
• RAID 0 (must be enabled from the CLI and provides no data protection from failed drives).
Virtual Copy is a legacy HPE 3PAR term and is interchangeable with “Snapshot.”
A CPG is a template for the creation of logical disks that allocate space to virtual volumes on demand. A CPG allows up to 65,536 virtual volumes to share a CPG’s assigned resources. You can create fully provisioned virtual volumes (FPVVs), Thinly Deduped Virtual Volumes (TDVVs) and
Compressed VVs that draw space from a CPG’s logical disks. It is important to note that if no volumes of any type have been created in a CPG, it consumes no space.
VVs (Virtual volumes) draw their resources from the LDs in CPGs and are exported as LUNs (Logical Unit Numbers) to hosts. Virtual volumesare the only data layer visible to the hosts. You can create clones (previously known as full copies) or snapshots (previously known as virtual
copies) of virtual volumes. Clones remain available if the original base volume becomes unavailable. VVs can be created using the CPGs created at installation time or user defined CPGs.
For a host to see a VV, the volume must be exported as a LUN. Volumes are exported by creating VV-LUN pairings (VLUNs) on the system.When you create VLUNs, the system produces both VLUN templates that establish export rules, and active VLUNs that the host sees as LUNs as attached disk devices. A VLUN will be created for each path available to the host for each VV exported.
A FPVV virtual volume is a volume that uses logical disks that belong to a CPG. Unlike TPVVs or TDVVs, fully provisioned virtual volumes have a set amount of user space that is allocated for user data. The fully provisioned volume size is allocated and consumed at the time of provisioning, size limits range from 256 MB to 64 TB (Compressed and Dedupe VVs have a maximum size of 16 TiB). The volume size can be increased at any time (provided free space is available) up to the maximum 64 TiB size without any downtime however, the VV size cannot be decreased below the initial allocation.
A TPVV is a volume that uses logical disks that belong to a CPG. TPVVs, TDVVs, or DECO VVs (deduped and compressed) associated with the same CPG draw space from those CPGs’ LDs as needed, allocating space on demand in 16 KiB increments for each VV. As the volumes that draw
space from the CPGs’ LDs (including compressed and deduped) require additional storage the HPE 3PAR OS automatically creates additional logical disks or expands the size of existing LDs and adds them to the CPG until the CPG reaches a user-defined growth limit, if one has been set,
or the system runs out of space.
In addition to the features and functionality of TPVVs; TDVVs go through an additional process before allocating space on a disk. All data writes with a block size 16 KiB or greater have a unique hash generated and the resulting value is compared to a hash lookup table to determine if the
data has already been stored. If the data is a duplicate of existing data, an entry is added to the destination volume’s lookup table but no data is written. Otherwise it is written to disk. For more information on this, refer to the HPE 3PAR Thin Technologies white paper located here.
A clone duplicates all the data from a base volume to a destination volume. The base volume is the original volume that is copied to the destination volume. The clone on the destination volume remains available if the original base volume becomes unavailable.A clone requires the destination volume have usable capacity equal to or greater than the usable capacity of the base volume being cloned. As of HPE 3PAR OS 3.2.1 the clone can be exported immediately after creation, while the data copy continues in the background.
Unlike a clone, which is a block for block duplicate of an entire volume, snapshots preserve a bitmap of a VV at a particular point in time.Updates to VVs are written to SD (Snap Data) space and the bitmap (Snap Admin space) of the VV.
Snapshots for FPVVs, TPVVs, dedupe compressed and DECO clones and other snapshots are created using copy-on-write techniques available(aka Virtual Copy) snapshots for TDVVs are created using ROW (Redirect On Write). Hundreds of snapshots of each virtual volume can becreated assuming that there is sufficient storage space available. It is worth noting that snapshots do not consume any space unless data on the base volume has been updated and the original data copied to the SD (Snap Data) space. Changed data is copied only once regardless of thenumber of snapshots taken. Snapshots are particularly useful for test/dev environments as they can be created in seconds and exported while not effecting production data. Also, testers and developers can be granted the ability to create snapshots while not having any ther administrative privileges, lowering administration requirements (see the HPE 3PAR CLI guide for correct usage for granting the updatevv privilege). Snapshots can now be updated without the requirement to unexport and re-export the VV. For more information on snapshot/Virtual Copy technologies refer to the white paper here .
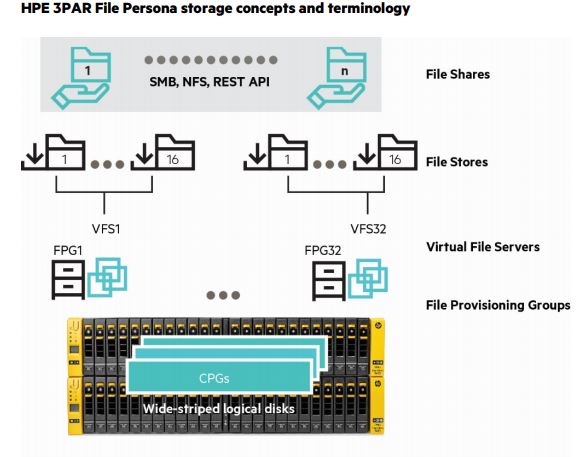
A File Provisioning Group (FPG) is an instance of the HPE intellectual property Adaptive File System. It controls how files are stored and retrieved. Each FPG is transparently constructed from one or multiple Virtual Volumes (VVs) and is the unit for replication and disaster recovery for File Persona Software. There are up to 16 FPGs supported on a node pair.
A Virtual File Server (VFS) is conceptually like a server; as such it presents virtual IP addresses to clients, participates in User Authentication Services and can have properties for such characteristics as user/group Quota Management and Antivirus policies.
File Stores are the slice of a VFS and FPG where snapshots are taken, capacity Quota Management can be performed, and Antivirus Scan Services policies customized.
File Shares are what provide data access to clients via SMB, NFS, and the Object Access API, subject to the share permissions applied to them
0 دیدگاه | سپتامبر 28, 2019
ارسال شده توسط admin | در دسته بندی Uncategorized
HPE Discover is due to kick off in Madrid next week and HPE have continued their current tradition of releasing all the big news before the show.
I’ve been lucky enough to attend a few Discovers now and I have noticed some interesting trends in the type of announcements. Previously it was all about physical products, what were the newest models what were the hardware innovations in these products. This year all the key announcements are software based and focus on enhancing user experience.
Ironically for many years whilst storage systems stored lots of data on them, the data analytics for managing the systems was somewhat lacklustre. Data was gathered from these systems and sent back to base but it was a simple affair which alerted you to failed components such as a disk. Nimble Storage saw a unique opportunity in this area and acted upon it by developing their class leading InfoSight analytics platform.
Like other storage systems Nimble sends data home, but where things get different are in the breadth of statistics collected and what happens to them once they are sent back to base. Nimble realized that by taking the data from their entire install base and then using machine learning against this, insights could be developed to predict issues before they even occur. I have two impressive stats to back this up; 86% of issues are being detected and fixed before the customer even knows about it and 54% of issues resolved are outside of storage. This ability to diagnose issues outside of storage closed what Nimble termed the app data gap.
The first major announcement from HPE Discover is that InfoSight is now able to utilise AI. We discussed previously how Nimble had built a cloud analytics platform from all the data that was being sent home. InfoSight was able to analyse and predict future patterns using machine learning. The introduction of AI allows this to be taken to the next level by enabling more complex issues to be automatically addressed.
Recommendations will go beyond simple problem prevention to include resource optimisations, ensuring you getting the most from your system. Again this is not just for the storage itself but the whole ecosystem for example it may recommend the movement of a VM to a different volume. The name of this new AI functionality “AI recommendation engine” clearly indicates its future direction for further automation.
You can see more about the AI capabilities in the video below:
The second piece of InfoSight news is that it is coming to 3PAR. 3PAR has always had a rich amount of telemetry being sent home but up until now it has arguably not been fully utilised. But of course lots of data without the tools to interpret and act upon it is not much use and this is what InfoSight has enabled.

Like the Nimble system before it InfoSight on 3PAR will not just report on the storage itself but down to the application level. To benefit from InfoSight on 3PAR you need to be running 3PAR OS 3.3.1 have an active support contract and of course have your 3PAR configured to dial home.
The Nimble AI recommendations and 3PAR InfoSight are both free for customers with a active support contract and are expected in January 2018
I’m sure that the HPE engineering team are working at a furious pace to get InfoSight out across to as many products, as quickly as possible. It’s clear to see that improved analytics would not only reduce operational issues but that the introduction of AI driven resource recommendations will drive the move to an automated data centre. It seems obvious that automated resource allocation recommendations would fit in nicely with Synergy where the ability to spin up and down workloads dynamically could then be orchestrated intelligently.
0 دیدگاه | سپتامبر 28, 2019
ارسال شده توسط admin | در دسته بندی Uncategorized
HPE StoreVirtual VSA Software transforms your server’s internal or direct-attached storage into a fully-featured shared storage array without the cost and complexity associated with dedicated storage. StoreVirtual VSA is a virtual storage appliance optimized for VMware vSphere. StoreVirtual VSA creates a virtual array within your application server and scales as storage needs evolve, delivering a comprehensive enterprise-class feature set that can be managed by an IT generalist. The ability to use internal storage within your environment greatly increases storage utilization. The unique scale-out architecture offers the ability to add storage capacity on-the-fly without compromising performance. Its built-in high availability and disaster recovery features ensure business continuity for the entire virtual environment.
Enjoy all the benefits of traditional SAN storage without a dedicated storage device. HPE StoreVirtual VSA Software allows you to build enterprise level, highly available, shared storage functionality into your server infrastructure to deliver lower cost of ownership and superior ease of management.
All StoreVirtual VSA nodes in your environment, onsite or across multiple sites, can be managed from the Centralized Management Console (CMC). The CMC features a simple, built-in best practice analyzer and easy-to-use update process. Add more internal storage capacity to the cluster by simply adding servers with StoreVirtual VSA installed. No external storage device required: Create shared storage out of internal or external disk capacity (DAS, SAN); (FC or iSCSI).
Snapshots provide instant, point-in-time volume copies that are readable, writeable, and mountable for use by applications and backup software. Avoid data loss of any single component in a storage node with StoreVirtual’s multi-fault protection. Remote Copy enables centralized backup and disaster recovery on a per-volume basis and leverages application integrated snapshots for faster recovery.
Network RAID stripes and protects multiple copies of data across a cluster of storage nodes, eliminating any single point of failure in the StoreVirtual array. Applications have continuous data availability in the event of a disk, controller, storage node, power, network, or site failure. Create availability zones within your environment across racks, rooms, buildings, and cities and provide seamless application high availability with transparent failover and failback across zones—automatically.
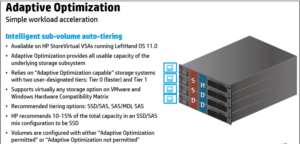
 Increase Scalability and Storage Efficiency
Use StoreVirtual VSA with solid-state drives (SSDs) to provide a high-performance storage solution in your environment. Create an all-flash tier for maximum performance or use a lower cost alternative with StoreVirtual Adaptive Optimization to create automated tiers with an optimized amount of SSDs. Maximize storage utilization by deploying high-performance arrays at the main site and cost-effective appliances at remote sites. Use management plug-ins for VMware vCenter. Lower storage costs and achieve high availability with as few as two nodes that easily scale from within Scale-out storage architecture allows the consolidation of internal and external disks into a pool of shared storage. All available capacity and performance is aggregated and accessible to every volume in the cluster. As storage needs grow, the cluster scales out linearly while remaining online.
Built on an open-standards platform, StoreVirtual VSA software can run on any modern x86-based hardware in VMware vSphere, Microsoft Hyper-V, and Linux KVM hypervisors.
StoreVirtual technology components include targets (storage systems and storage clusters) in a networked infrastructure. Servers and virtual machines act as initiators with access to the shared storage. The LeftHand OS leverages industry-standard iSCSI protocol over Ethernet to provide block-based storage to application servers on the network. And for high availability it uses fail over manager or Quorum Disk’s.
HP StoreVirtual VSA is a proper virtual storage appliance (VSA) suppor
ted in production environments providing block-based storage via iSCSI.
A VSA is a virtual appliance deployed in a VMware environment which aggregates and abstracts physical underlying storage in a common storage pool which will be presented to the hypervisor and can be used to store virtual machine disks and related files.
StoreVirtual VSA can use both existing VMFS datastores and RDM (raw LUNs) to store data and it can be configured to support sub-volume tiering to move data chunks across tiers. StoreVirtual VSA as the “physical” HP StoreVirtual counterpart is a scale-out solution, this means that if you need to increase storage capacity, resilience or performance other StoreVirtual VSA nodes (i.e. virtual appliances) can be deployed.
A storage node is a server that virtualizes its direct-attached storage. In the case of StoreVirtual nodes, each one includes controller functionality—no external controllers needed. Storage nodes require minimal user configuration to bring them online as available systems within the Centralized Management Console (CMC).
Multiple StoreVirtual VSAs running on multiple servers create a scalable pool of storage with the ability to make data highly available. We can aggregate two or more storage nodes into a flexible pool of storage, called a storage cluster.
Multiple clusters can be aggregated together into management groups. Volumes, clusters and management groups within the shared storage architecture can be managed centrally through a single console.
A Management Group is a logical container which allow the management of one or more HP StoreVirtual VSAs, Clusters and Volumes. Management group will have credentials set on the configuration time .And these credentials will be used for any management task of any HP StoreVirtual belonging to this specific Management Group.
The Failover Manager (FOM) is designed to provide automated and transparent failover capability. For fault tolerance in a single-site configuration, the FOM runs as a virtual appliance in either a VMware vSphere, Microsoft Hyper-V Server, or Linux KVM environment, and must be installed on storage that is not provided by
the StoreVirtual installation it is protecting.
The FOM participates in the management group as a manager; however, it performs quorum operations only, it does not perform data movement operations. It is especially useful in a multi-site stretch cluster to manage quorum for the multi-site configuration without requiring additional storage systems to act as managers in the sites. For each management group, the StoreVirtual Management Group Wizard will set up at least three management devices at each site. FOM manages latency and bandwidth across these devices, continually checking for data availability by comparing one online node against another.
If a node should fail, FOM will discover a discrepancy between the two online nodes and the one offline node – at which point it will notify the administrator. This process requires at least three devices, with at least two devices active and aware at any given time to check the system for reasonableness: if one node fails, and a second node remains online, the FOM will rely on the third node to maintain quorum, acting as a “witness” to attest that the second node is a reliable source for data.
In smaller environments with only two storage nodes and no third device available to provide quorum, we can implement with any one of the below two option.
StoreVirtual 2-Node Quorum is a mechanism developed to ensure high availability and transparent failover between 2-node management groups in any number of satellite sites, such as remote offices or retail stores. A cost-effective, low-bandwidth alternative to the FOM, the feature does not require a virtual machine in that site, relying instead on a centralized Quorum Witness in the form of an NFSv3 file share as the tie-breaker between two storage nodes as shown below .
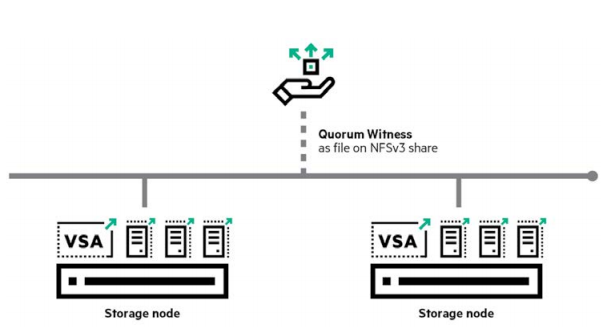
Quorum Witness uses a shared disk to determine which of the two nodes should be considered a reliable resource in the event of a failure. The shared disk is an NFS share that both nodes in the management group can access.
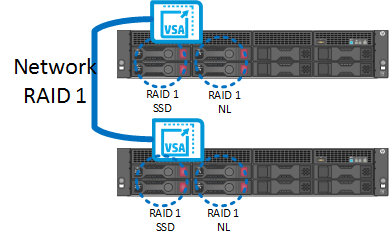
It is basically a shared volume crated with help of Network Raid protection. Network RAID (so the data protection level) can be set per volume. So multiple volumes can co-exist on a StoreVirtual cluster with different Network RAID levels. This Volume can be accessed through iSCSI protocol.
Network RAID protection which basically spreads data between different VSAs as the common RAID spreads data across different physical disks within the same array.
All StoreVirtual VSA nodes in your environment, onsite or across multiple sites, can be managed from the Centralized Management Console (CMC). The CMC features a simple, built-in best practice analyzer and easy-to-use update process
![]()
0 دیدگاه | سپتامبر 28, 2019
ارسال شده توسط admin | در دسته بندی Uncategorized
Continue of Part 1

Note:-You may see the Datastore information form this window.


Note: – Since there is no RDMs currently the option is greyed out.

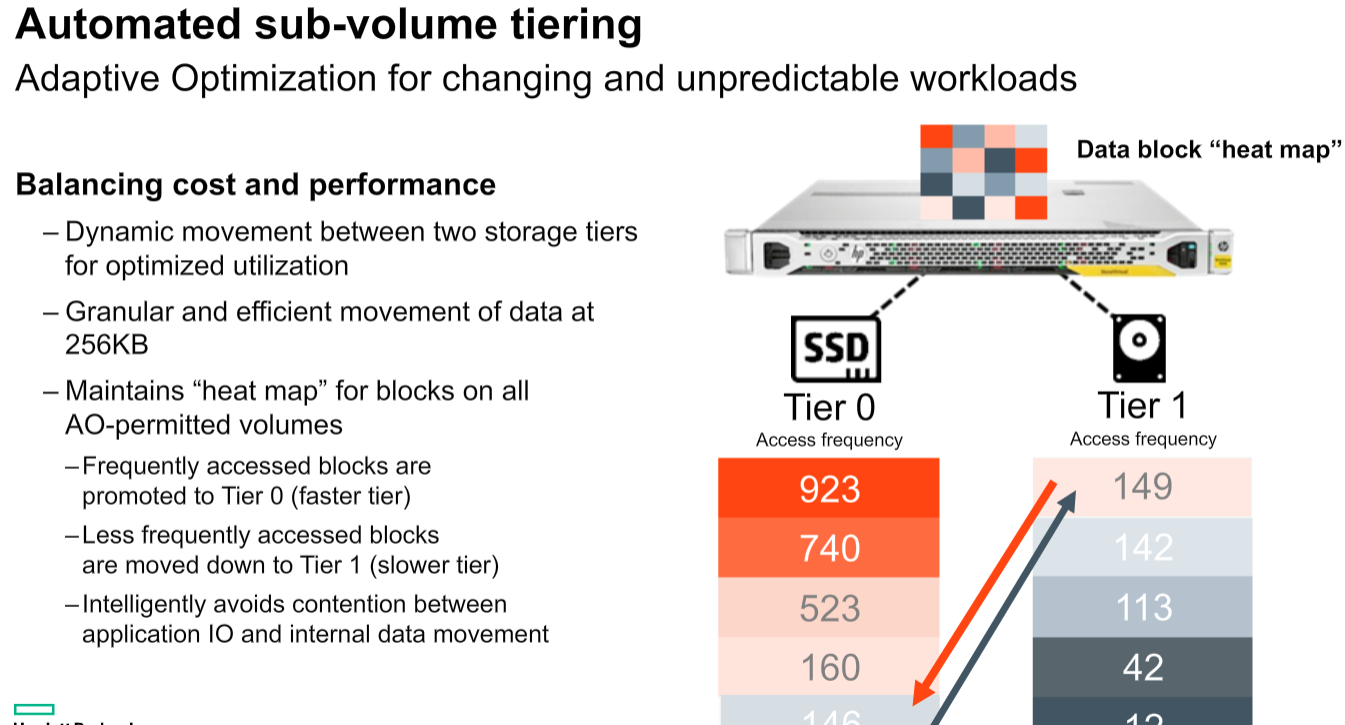
Note: – Also we can configure the Tiering, Select the Data store, Size and Tier, Tiering will be on differ type of disks like SSD, SAS or NL SAS. If have to use AO (Adaptive Optimization) Tiering should be configured. Refer # Step


Continue PART 3
0 دیدگاه | سپتامبر 28, 2019
ارسال شده توسط admin | در دسته بندی Uncategorized
Install the CMC on the computer or virtual machine that you use to administer the HP StoreVirtual Storage. You administer the entire network of StoreVirtual VSAs from this CMC.
To obtain the CMC, download the CMC installer from the following website
The CMC installation requires 63 MB disk space and 64 MB RAM during runtime. Installing the CMC in Microsoft Windows
1. Start the CMC installer.
2. Follow the steps in the installation wizard.
3. When the installation completes, HP is added as a separate Program Group and a shortcut icon is added to the microsoft Windows desktop.
To start the CMC:
• Double-click the icon on your desktop, or
• From the Start menu, select
All Programs→HP →HP StoreVirtual→HP StoreVirtual Centralized Management Console
The HP StoreVirtual VSA for vSphere is pre-formatted for use with VMware vSphere. We have to install VSA on all the ESXi hosts.
Download the StoreVirtual OS 12.5 from below link .And follow steps mentioned below to install and Configure VSA on vSphere Host.
![]()
Reference KB
As mentioned above once you have completed the download from the webpage you may found downloaded File will be named like below
HPE_StoreVirtual_VSA_2014_and_StoreVirtual_FOM_Installer_for_VMware_vSphere_TA688-10544.exe


Continue PART 2
0 دیدگاه | سپتامبر 28, 2019
ارسال شده توسط admin | در دسته بندی Uncategorized
Continue of Part 1
Note:-You may see the Datastore information form this window.
Note: – Since there is no RDMs currently the option is greyed out.
Note: – Also we can configure the Tiering, Select the Data store, Size and Tier, Tiering will be on differ type of disks like SSD, SAS or NL SAS. If have to use AO (Adaptive Optimization) Tiering should be configured. Refer # Step
Continue PART 3
0 دیدگاه | سپتامبر 28, 2019
ارسال شده توسط admin | در دسته بندی Uncategorized
Use the Same file which used for Deployment of VSA Applianace
HPE_StoreVirtual_VSA_2014_and_StoreVirtual_FOM_Installer_for_VMware_vSphere_TA688-10544.exe


Note:  You must select the Storage that is not provided by the Storevirtual installation it is protecting.


 Note: – There will be a pop-up message for before deployment as shown in the below image


Once the deployment is finished, Click “Finish”. Start the Centralized Management Console (CMC) and add the FOM nodes.
Continue PART 4
0 دیدگاه | سپتامبر 28, 2019
ارسال شده توسط admin | در دسته بندی Uncategorized
Why Multipathing ?
To maintain a constant connection between a host and its storage, ESXi supports multipathing. Multipathing is a technique that lets you use more than one physical path that transfers data between the host and an external storage device.
In case of a failure of any element in the SAN network, such as an adapter, switch, or cable, ESXi can switch to another physical path, which does not use the failed component. This process of path switching to avoid failed components is known as path failover.
In addition to path failover, multipathing provides load balancing. Load balancing is the process of distributing I/O loads across multiple physical paths. Load balancing reduces or removes potential bottlenecks.
To take advantage of this support, virtual volumes should be exported to multiple paths to the host server. For this we have to create a host definition on the HPE 3PAR Storage system that includes the World Wide Names (WWNs) of multiple HBA ports on the host server and then export the VLUNs to that host definition. For an ESXi cluster, the VLUNs must be exported to all of the host definitions for the cluster nodes, or a host set may be created containing all of the servers and the VLUNs.
Setting Round Robin path policy
VMware vSphere includes active/active multipath support to maintain a constant connection between the ESXi host and the HPE 3PAR StoreServ Storage array. Three path policies are available,
Fixed (VMware)
The host uses the designated preferred path, if it has been configured. Otherwise, it selects the first working path discovered at system boot time. If you want the host to use a particular preferred path, specify it manually. Fixed is the default policy for most active-active storage devices.
Note
If the host uses a default preferred path and the path’s status turns to Dead, a new path is selected as preferred. However, if you explicitly designate the preferred path, it will remain preferred even when it becomes inaccessible.
Most Recently Used (VMware)
The host selects the path that it used most recently. When the path becomes unavailable, the host selects an alternative path. The host does not revert back to the original path when that path becomes available again. There is no preferred path setting with the MRU policy. MRU is the default policy for most active-passive storage devices.
Round Robin (VMware)
The host uses an automatic path selection algorithm rotating through all active paths when connecting to active-passive arrays, or through all available paths when connecting to active-active arrays. RR is the default for a number of arrays and can be used with both active-active and active-passive arrays to implement load balancing across paths for different LUNs.
For HPE 3PAR storage, Round Robin is the recommended policy for best performance and load balancing; however, it may not be enabled by default. The path policies can be viewed and modified from the VMware vSphere Web Client on a per datastore basis as follows:

Below Picture shows HPE 3PAR StoreServ Fast Class VLUN that has most recently used and active IO only on one path .

Change the policy to Round Robin path and check the status of “Active (I/O)” , it will be like below

Setting IOPS option for Round Robin policy
Managing a Round Robin I/O path policy scheme through the vSphere Web Client on a per datastore will not allow setting . We can modify the Round Robin policy details from command line on the ESXi host. To achieve better load balancing across paths,the –iops option may be issued on the command line to specify that the path should be switched after performing the specified number of I/Os on the current path. By default, the –iops option is set to 1000. The recommended setting for HPE 3PAR Storage is 1, and this setting may be changed as needed to suit the demands of various workloads.
Set the Round Robin policy for a specific device
# esxcli storage nmp device set –device <device-name> –psp VMW_PSP_RR
To set the device specified by –device to switch to the next path after 1 I/O operation has been performed on the current path
# esxcli storage nmp psp roundrobin deviceconfig set –type=iops –iops=1 –device <device-name>
Automating Round Robin policy for all LUNs
To automate this we have to edit the SATP rule or created using esxcli commands on the ESXi host to automatically achieve aRound Robin path policy for newly discovered LUNs.
Use the following command to create a custom SATP rule that will allow the ESXi host to configure the HPE 3PAR LUNs to use Round Robin multipath policy. The command must be executed on each ESXi host that is connected to the HPE 3PAR array.
#esxcli storage nmp satp rule add -s “VMW_SATP_ALUA” -P “VMW_PSP_RR” -O “iops=1” -c “tpgs_on” -V “3PARdata” -M “VV” -e “HP 3PAR Custom Rule”
Verify the new rule using the following command:
# esxcli storage nmp satp rule list | grep “3PARdata”
![]()
Note:New rule will be effective when adding new devices to the ESXi host, For existing LUNs, either a host reboot is required, or the path policy must be set for each LUN.
0 دیدگاه | سپتامبر 28, 2019